Work Faster in RStudio – Shortcuts, Tips, & Tricks
Updated: February 23, 2022.
In this article, we have compiled many of our favorite RStudio shortcuts and tips to help increase your productivity while working with the RStudio IDE. We’ll also provide information about supplemental tools and techniques that are useful for data scientists that work with R.
You can expect to learn the following from today’s article:
- How to Navigate RStudio
- How to Use Shortcuts
- How to Execute and Format Code
- Console History & The History Pane
- Dealing with Tabs
- Code Inserting Shortcuts
- How to Use Code Snippets
- How to Create Custom Snippets in RStudio
- How to Use Search in RStudio
- How to Edit with Multiple Cursors
- How to Use R Addins
- RStudio and Python – Best Tips and Tricks
- Bonus Tips: vim settings, .RProfile, .Renviron, and Docker
Note: We present both PC and Mac shortcuts in the GIFs, but we refer only to PC shortcuts in the article. Most Mac shortcuts fall under this dependence:
- CTRL = ⌘ Command
- Alt = ⌥ Option
In some cases, Ctrl will also be the Control key on Mac, which might be confusing at first. We recommend you to look up proper shortcuts on RStudio’s website or within or within RStudio itself by pressing ⌥ Option + Shift + K (Alt + Shift + K).
Note: At the time of writing this article, Posit PBC was RStudio PBC. We use RStudio and Posit interchangeably in this text (e.g. RStudio Connect == Posit Connect).
How to Navigate the RStudio IDE
We guarantee you’ll use at least a few RStudio panes regularly. If you want to speed up your workflow, you should learn how to focus between them quickly, without a mouse or a trackpad. Start by pressing Ctrl (in this case also Control on Mac) and a number corresponding to the desired pane.
Working with Workbench? Use Appsilon’s Top 5 Tips for RStudio Workbench and Desktop.
Add Shift to the combination if you want to toggle maximize pane for the one that you are switching to at the same time. The only pane with a different access shortcut is the terminal (Shift+Alt+t). Preset windows:
- Help: 3
- History: 4
- Plots: 5
- Environment: 8
The two you’ll mostly use are Source Editor (1) and Console (2).
Let’s now discuss how you can improve how you work in those.
Tips for How to Use Shortcuts in RStudio
Usually, the first thing you have to do when starting a new R project is to write some code. There are some features that can make writing code both easier and faster. Even basic tricks can have a significant impact once you master them – especially when combined.
Code Completion
A suggestion list will pop up as you type or can be accessed manually by either pressing Tab or Ctrl + Space. You can adjust the settings in Global Options -> Code -> Completion. To fill in the suggested phrase you have to press either Tab or Enter. Pressing Ctrl + Space with the auto-completion list open will close it. You can navigate through the suggestion list with arrows or just hover over the item before filling it in.
If the list is too long, try writing more letters to narrow it down.
It’s good to know that auto-completion in R supports fuzzy matching. This means you don’t really have to type all the letters – you can skip any of them as long as those typed are in order and identify what you are looking for. It is especially useful for long function names that you use often. Mastering this will allow you to type code much faster. Note that for fuzzy matching to work with auto-completion, the suggestion popup must be already active. In case it doesn’t behave as you would expect, try tweaking it in code completion options.
Paths
When you need to type a path, can use file path auto-complete which can be brought up by pressing the auto-completion shortcut (Tab or Ctrl + Space) from a pair of double or single quotes.
By default it starts in your working directory, you can navigate from the root location like in shell console starting with “/”, or step-up levels in the directory tree by stacking “../”
How to Execute and Format Code in RStudio
We’ll now go over a set of useful RStudio shortcuts and tips that allow you to run the code in R scripts in different ways, reformat the R script, fix indentations, and move code blocks throughout the file.
Shortcuts to run R code
Leverage the following shortcuts to make running your R code easier:
- Ctrl + Enter – Runs the current line and jumps to the next one, or runs the selected part without jumping further.
- Alt + Enter – Allows running code without moving the cursor to the next line if you want to run one line of code multiple times without selecting it.
- Ctrl + Alt + R – Runs the entire script.
- Ctrl + Alt + B/E – Run the script from the Beginning to the current line and from the current line to the End.
Reformat R scripts
Use the following shortcuts in RStudio to reformat your code:
- Ctrl + I – Fixes line indentations.
- Ctrl + Shift + A – Does a complete reformat of the selected part of a code.
If you are not happy with the outcome of those you can always undo the changes. We recommend the styler package if you’re looking for a more flexible solution for styling.
Move code blocks through the R script
Moving lines of code up and down is easily achieved with an Alt + Up/Down combination; there is no need to cut and paste. You can move a single active line that way, or even a whole selection. If you need to remove something Ctrl + D will delete the current line/selection in no time.
Console History & History Pane
You only have to run a piece of code once in the console. Accessing previously executed lines is as easy as navigating with the up arrow and down arrows to cycle between them in chronological order. For more visual feedback, press the Ctrl + Up arrow to get a list of the last commands. If you combine it with typing in a part of the searched phrase you can narrow it down and easily find even complicated commands that are buried deep in the history. It will also override autocomplete popup if it’s active.
Note: searching console history doesn’t support fuzzy matching. If you want to clear your console, use Ctrl+L. The command history will be preserved.
There is also a History pane(4) that stores executed commands. It allows search and easy selection of the ones you need (pick range with Shift or gather individual positions with Ctrl). Then insert them back into the console (Enter) or source file (Shift + Enter). The latter helps you avoid copying multiple commands from the console to source manually which is troublesome due to line signs “>” that get copied as well and would otherwise have to be removed.
Dealing with Tabs
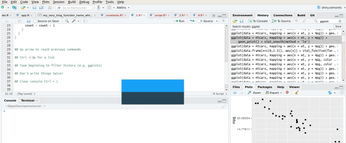
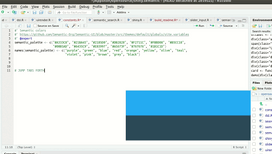
You’ll work with more than one tab more often than not. Switching between them is easy with Ctrl+Tab and Ctrl+Shift+Tab combinations. It allows you to jump to the next and previous tab, respectively. An alternative way to do the same is with Ctrl + F11/ F12 if it suits you better. It is also possible to jump to the first or last one by adding Shift to those. The last option is navigating through tabs in the order they were accessed with Ctrl + F9/F10.
Navigate tabs history
Jumping tabs
Going through tabs
Closing tabs
You can close a current tab with Ctrl + w. It is a much better choice than using those small “x” buttons on the right side of your tabs. If you get to the point where you have a huge amount of tabs open you can:
Close All | Ctrl + Shift + w (+ Alt to keep the currently open one):
Or if you prefer to keep many tabs open, you can search through your open tabs with Ctrl + Shift + . Remember to be exact, as there’s no fuzzy matching here. This search can also be activated with the”>>” icon on the tabs bar.
The above shortcuts are also accessible from the File dropdown menu – this can come in handy while using the RStudio browser session or simply if you forget them.
Code Inserting Shortcuts in RStudio
We’ll now go over a couple of interesting shortcuts that automatically insert code to your R scripts.
Operators and sections
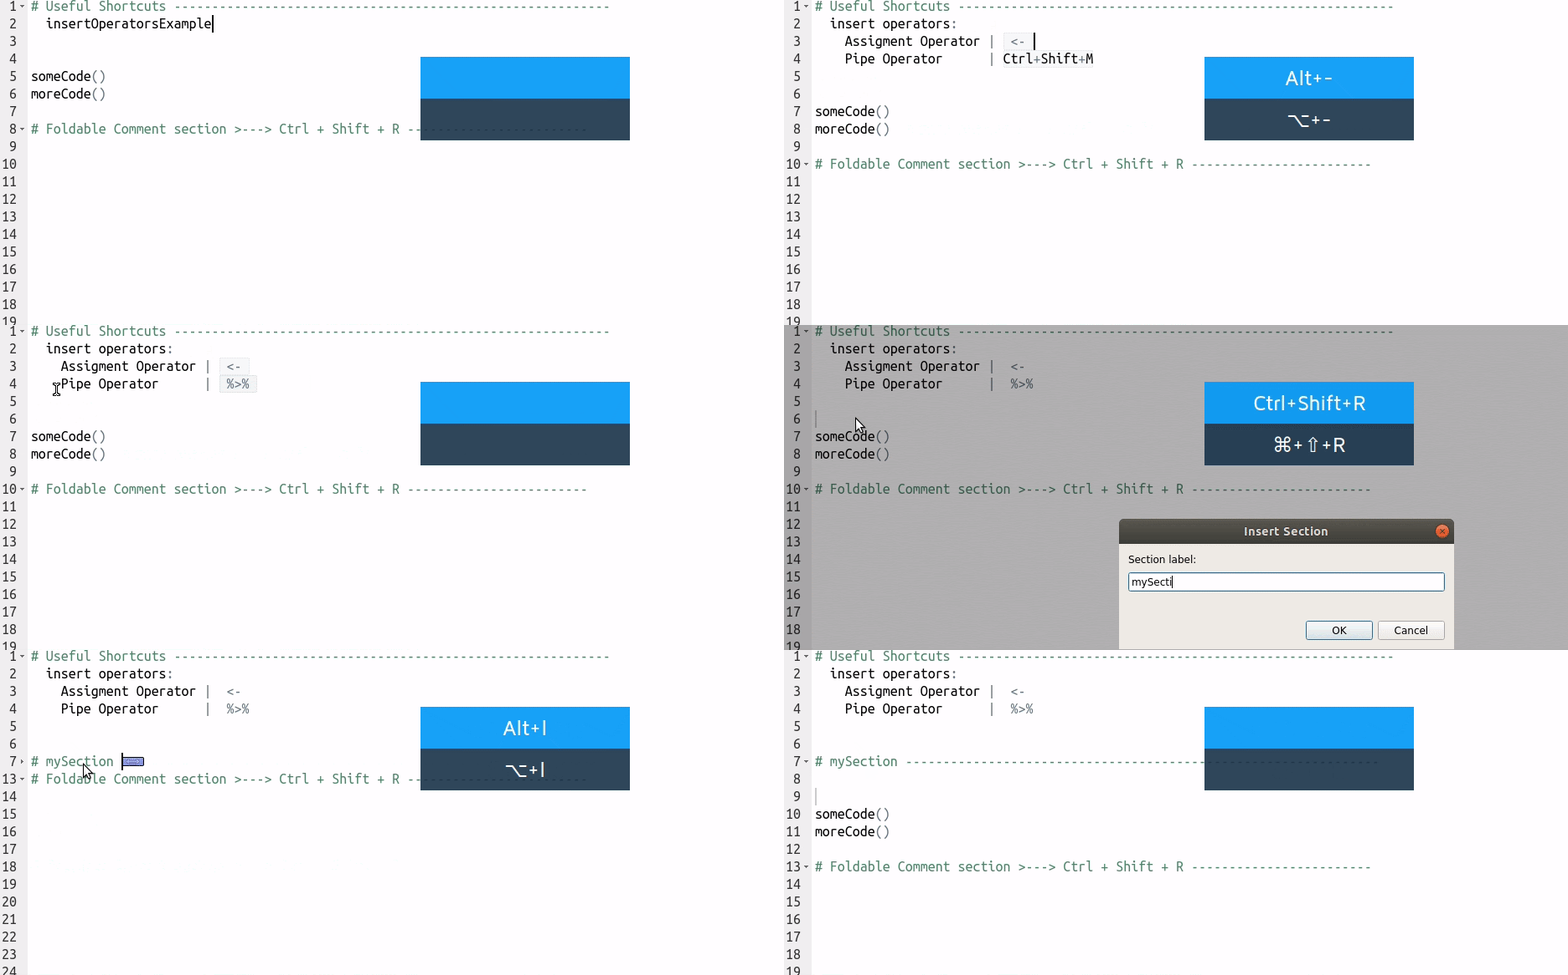
- Alt + (-) – Inserts the assignment operator (
<-) with spaces surrounding it. - Ctrl + Shift + M – Inserts the magrittr/pipe operator (
%>%) with spaces surrounding it. - Ctrl + Shift + R – Creates a foldable comment section in your code. These are used for code externalization with
knitr:read_chunk()function. Learn more. - Alt + L – Collapse active section.
- Alt + O – Collapse all sections.
- Alt + Shift + L – Open active section.
- Alt + Shift + O – Open all sections
Function/Variable extraction
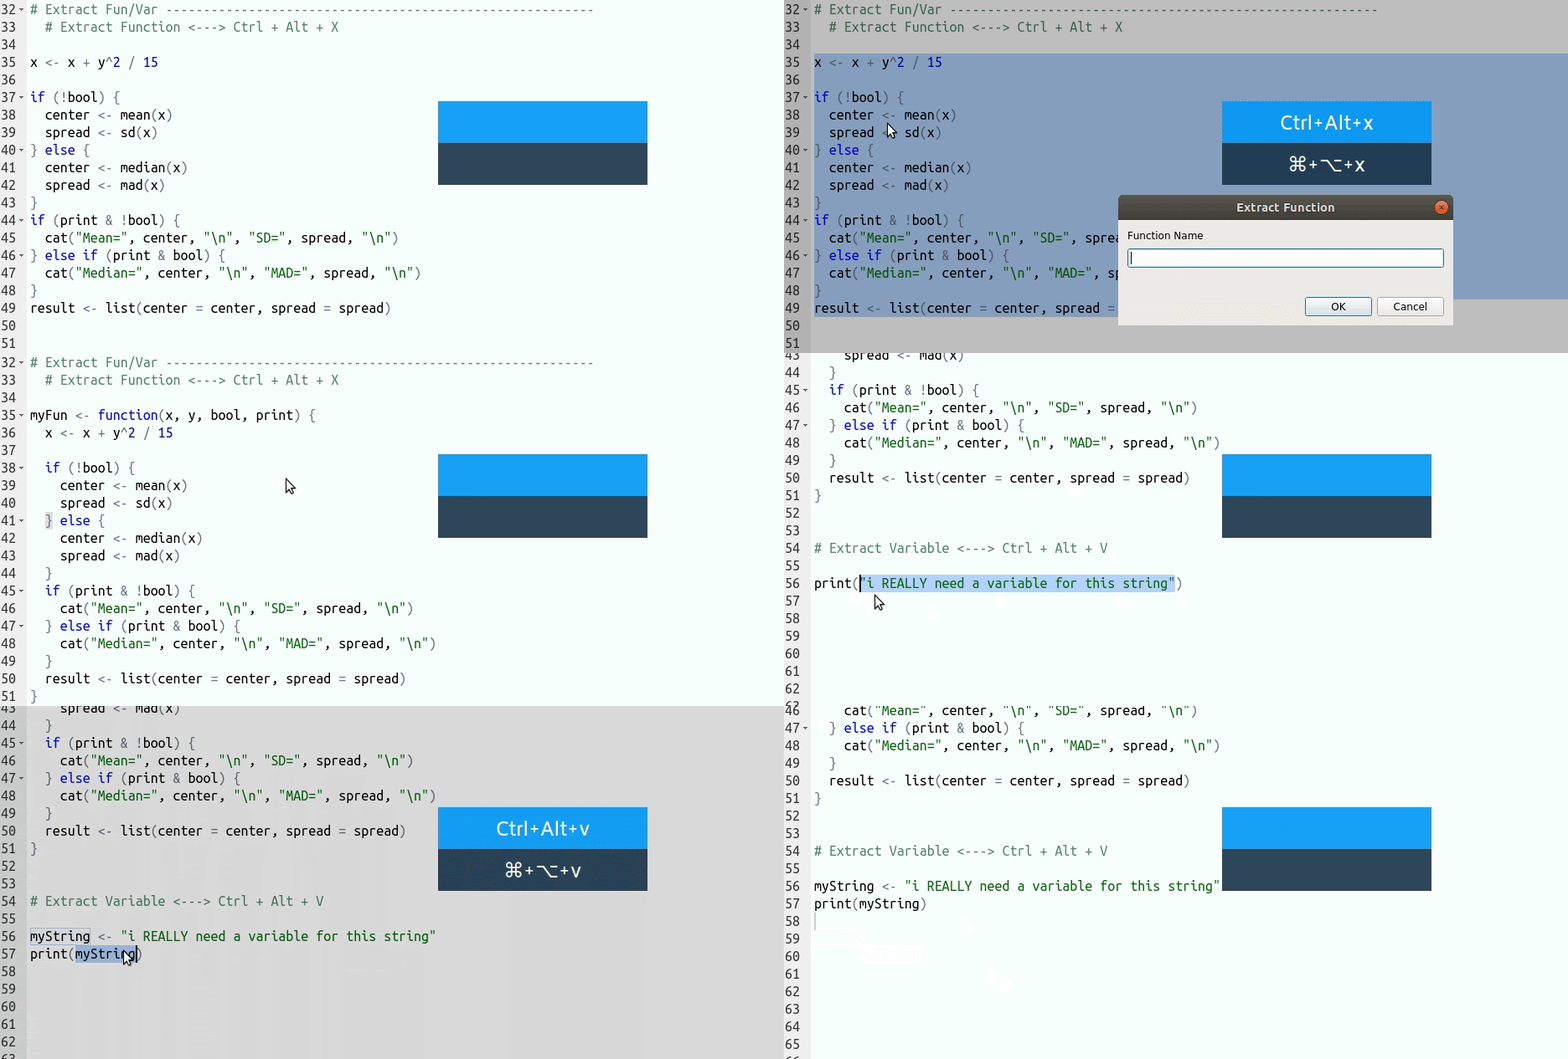
If you have a statement that you want to convert into a function, don’t start from scratch. Select it and press Ctrl + Alt + X – a shortcut for “extract into function”. You only need to provide the function name, all necessary inputs will be filled in automatically.
There is also a similar shortcut for a variable extraction available with Ctrl + Alt + V. Here’s a usage example:
Renaming in Scope
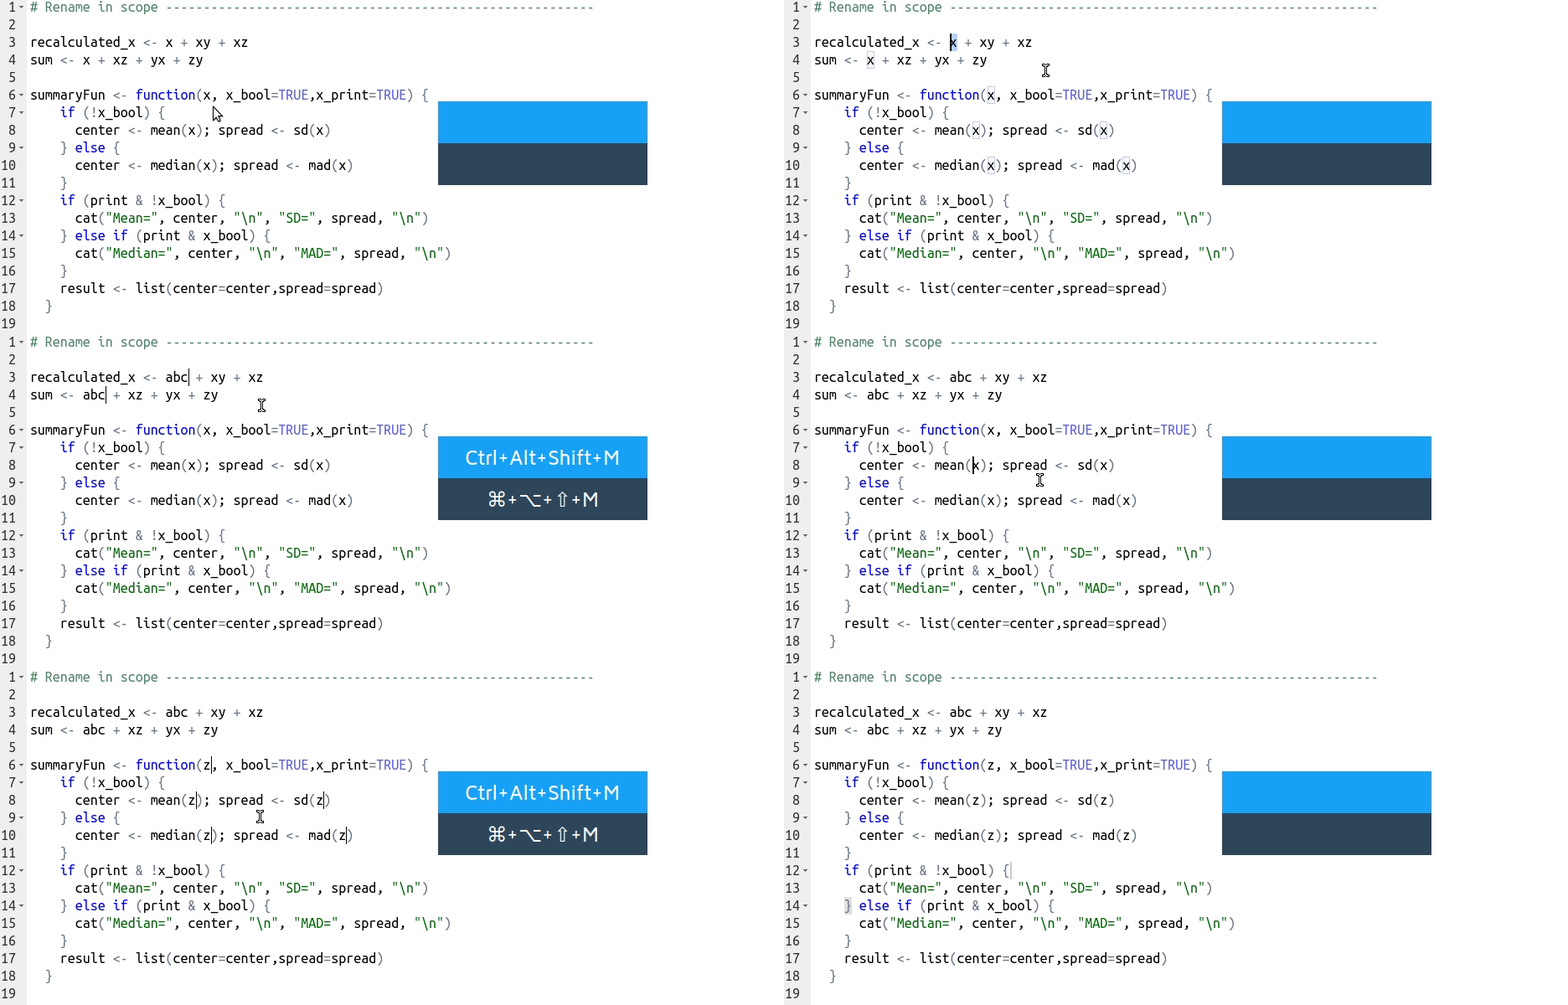
If you have to change a variable name in multiple places but you are afraid that “find and replace” will mess up your code, fear not. It’s possible to rename in scope only. It’s achieved by selecting the function or variable we want to change and pressing Ctrl + Shift + Alt + M.
It selects all occurrences in scope, you will have to just type a new name.
Yes, the shortcut is long, but it can be helpful. We find it to be easier to remember as an extension of the magrittr operator shortcut, so Pipe + Alt.
Using Code Snippets in RStudio
Tired of writing the same chunks of code over and over and having to remember all of the brackets and required parameters for functions? A good way to avoid it is by using code snippets. This part of our RStudio shortcuts and tips article teaches you everything you need to know.
What are code snippets?
Code snippets are pieces of re-usable boilerplate code.
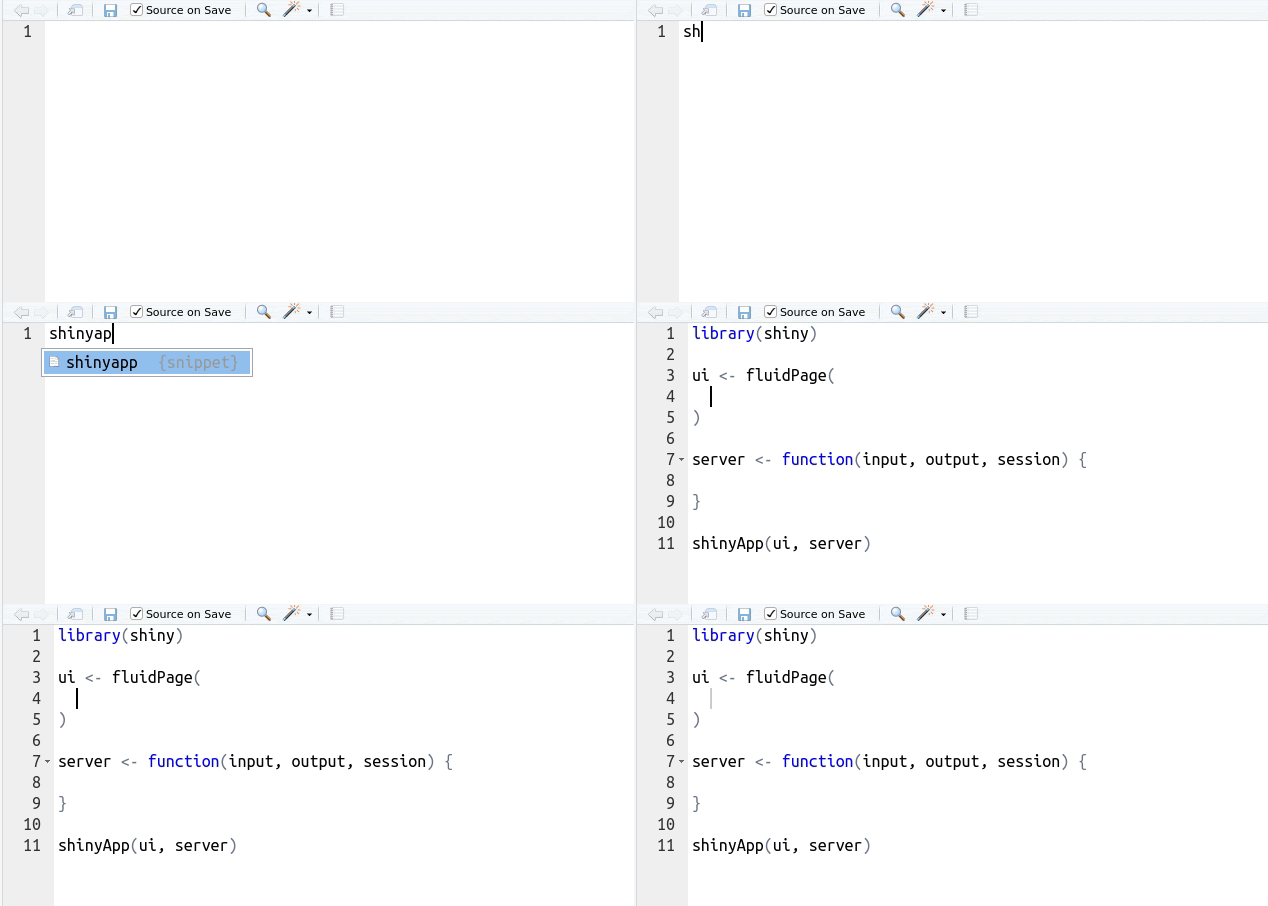
Snippets are perfect for automatically inserting boilerplate code and avoiding the duplication of simple tasks. If you are looking for a way to speed up writing large parts of code when time is limited (e.g. live coding during a presentation), code snippets can be very useful.
How do I use code snippets?
Snippets can be recognized on your auto-completion list by a {snippet} tag.
Write the snippet name, press Shift + Tab, or Tab twice to use it. If your input is needed to complete it – just fill out positions with elements that are important. You can cycle through them with Tab.
Some of the snippets which are available by default include:
- Declarations – lib, req, fun, ret, mat
- Loops – for, while, switch
- Conditionals – if, el, and ei for conditionals
- Apply family functions – apply, lapply, sapply, etc.
- S4 classes/methods definitions – sc, sm, and sg.
- Shiny App template – shinyapp
And that’s just for R! There are also snippets for other languages and it is very easy to customize and define your own!
You might have noticed that we used insertOperatorsExample, a simple custom snippet we created on the first GIF demonstrating operator shortcuts.
How to Create Custom Code Snippets in RStudio
For customizing or creating your own snippets use the Edit Snippets button under the Snippets section in Tools -> Global Options -> Code.
To better understand how to can create snippets, let’s take a look at a matrix and function snippets declarations code as an example.
matrix(${1:data}, nrow = ${2:rows}, ncol = ${3:cols})
$ sign is used as a special character to denote where the cursor should jump after completing each section of a snippet. Inside the brackets, we have a field index (the order in which the cursor will jump after pressing the tab), 0 is used as the last field, and the text after a colon is used as information on what should be placed in that spot. In order to insert a literal “$” inside a snippet, it must be escaped as \$.
Snippets, besides generating code templates, can also run R code. It allows you to create dynamic snippets. By using r expr anywhere in your snippet your R code will be executed when the snippet is expanded, and the result inserted into the document.
As an example, take a look at the timestamp snippet declaration that is available by default.
`r paste("#", date(), "------------------------------\n")`
It runs a paste function to insert a comment with a current date into the code. Its execution resolves into something like this:
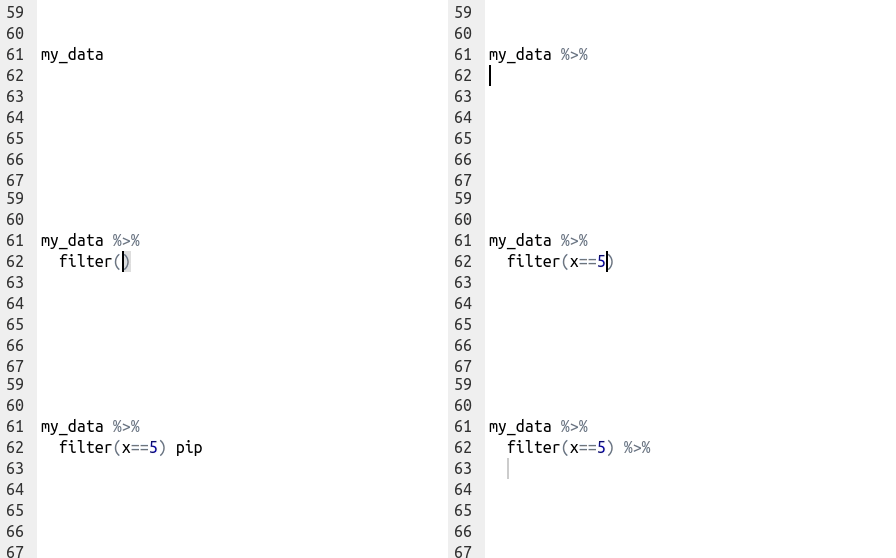
Let’s now create a custom snippet for inserting the pipe operator, but instead of space we will have a new line right after it:
`r paste(" %>%\n")`
Using Search in RStudio
In case you don’t have a lot of code yet, there are tools to generate it quickly. The next question is then, how to find things that you are looking for. There are multiple options available for search that you can use.
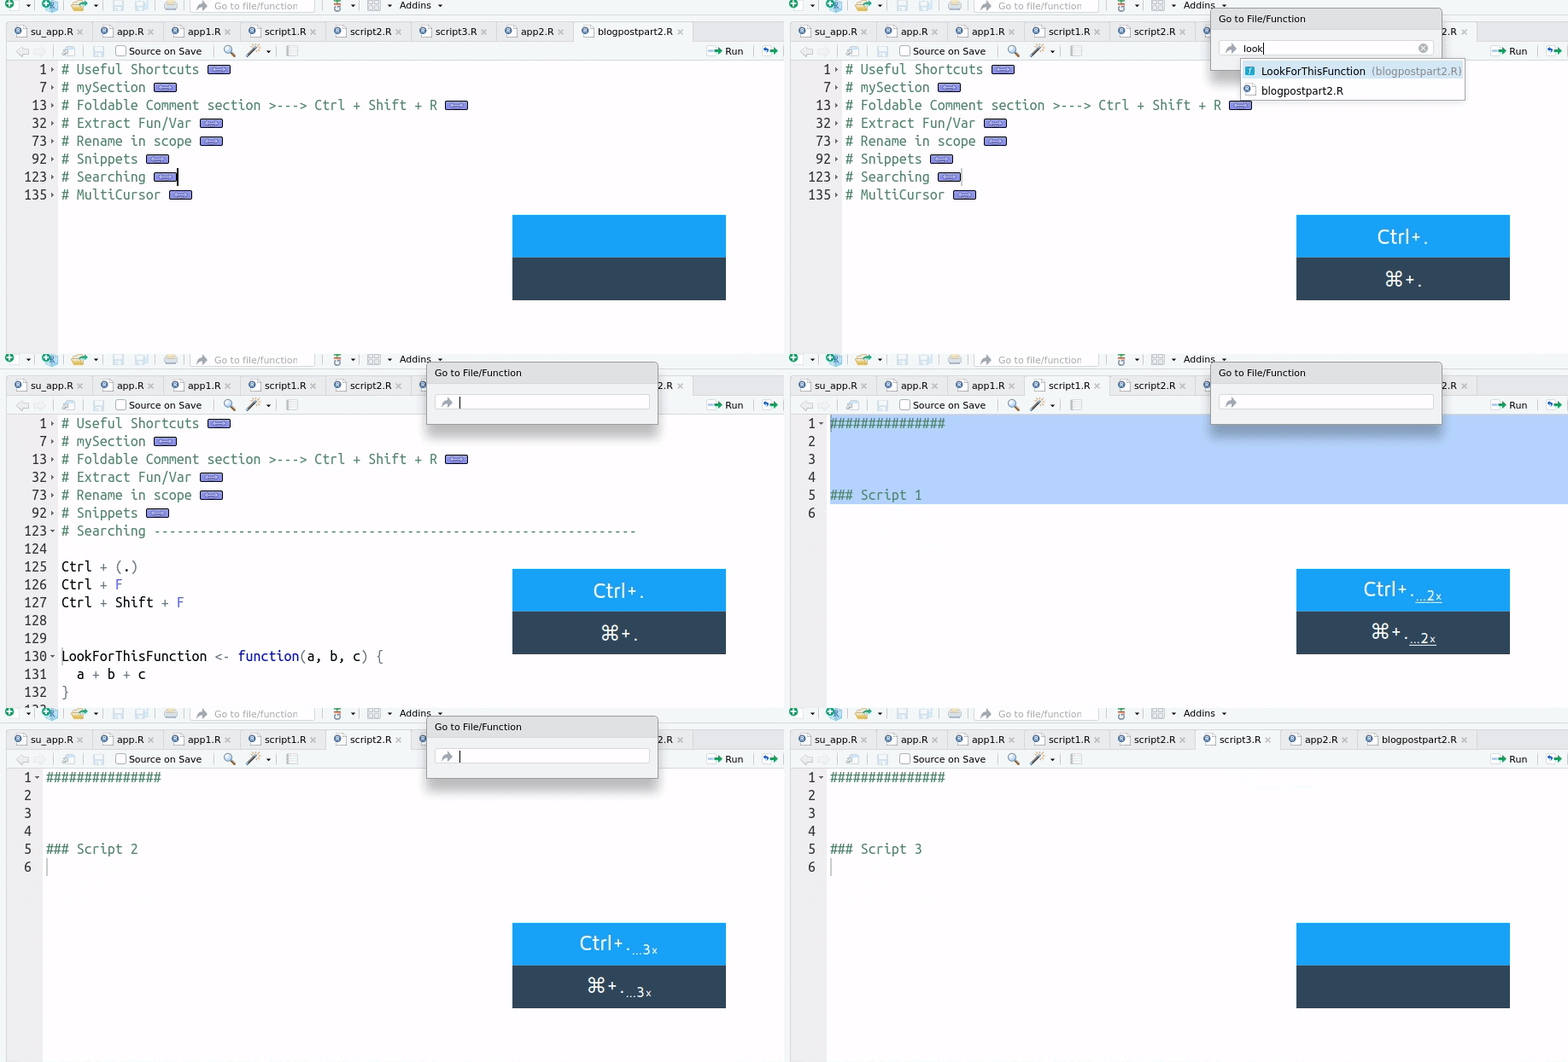
Go to file function Ctrl + (.). In there you can quickly search your project for a file or function and jump directly to it. It supports fuzzy matching so it’s easy to find what you need.
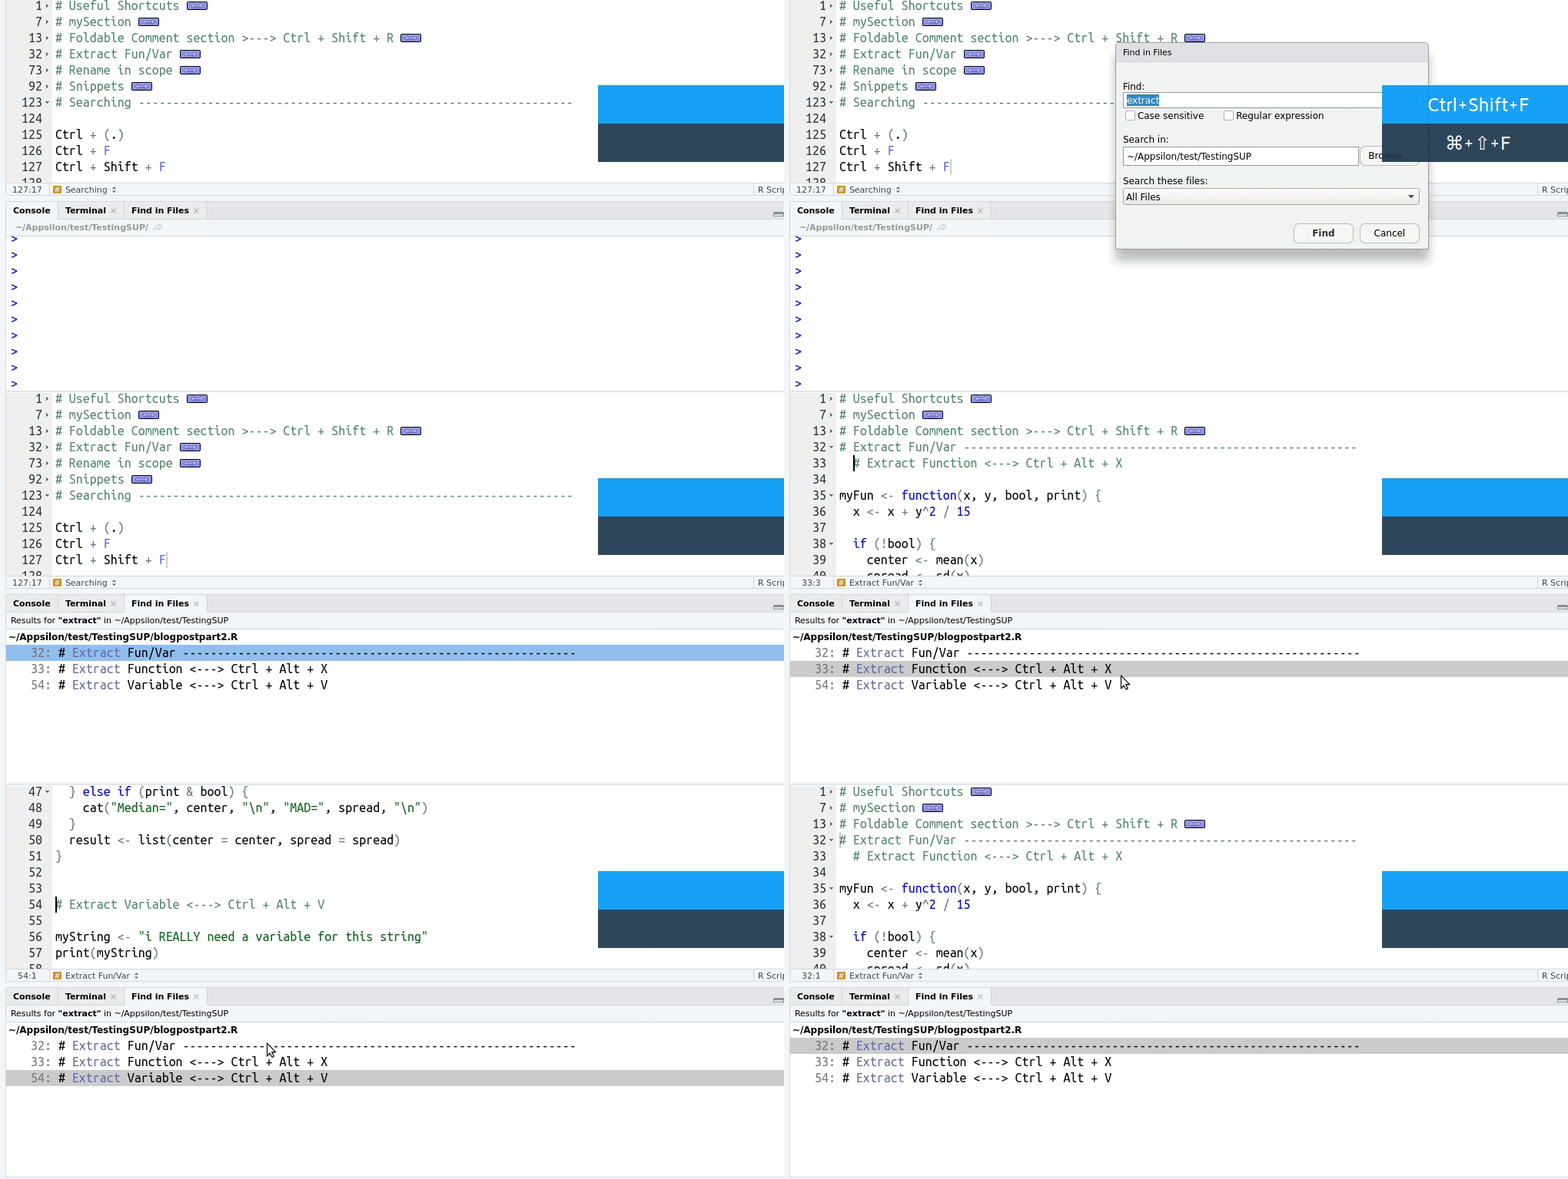
For more robustness, press Ctrl + Shift + F to call the Find in Files window. It allows you to search through files in a directory that you can specify (even outside the project). You can jump between elements you found by double-clicking them in the Find in Files window which opens next to the console.
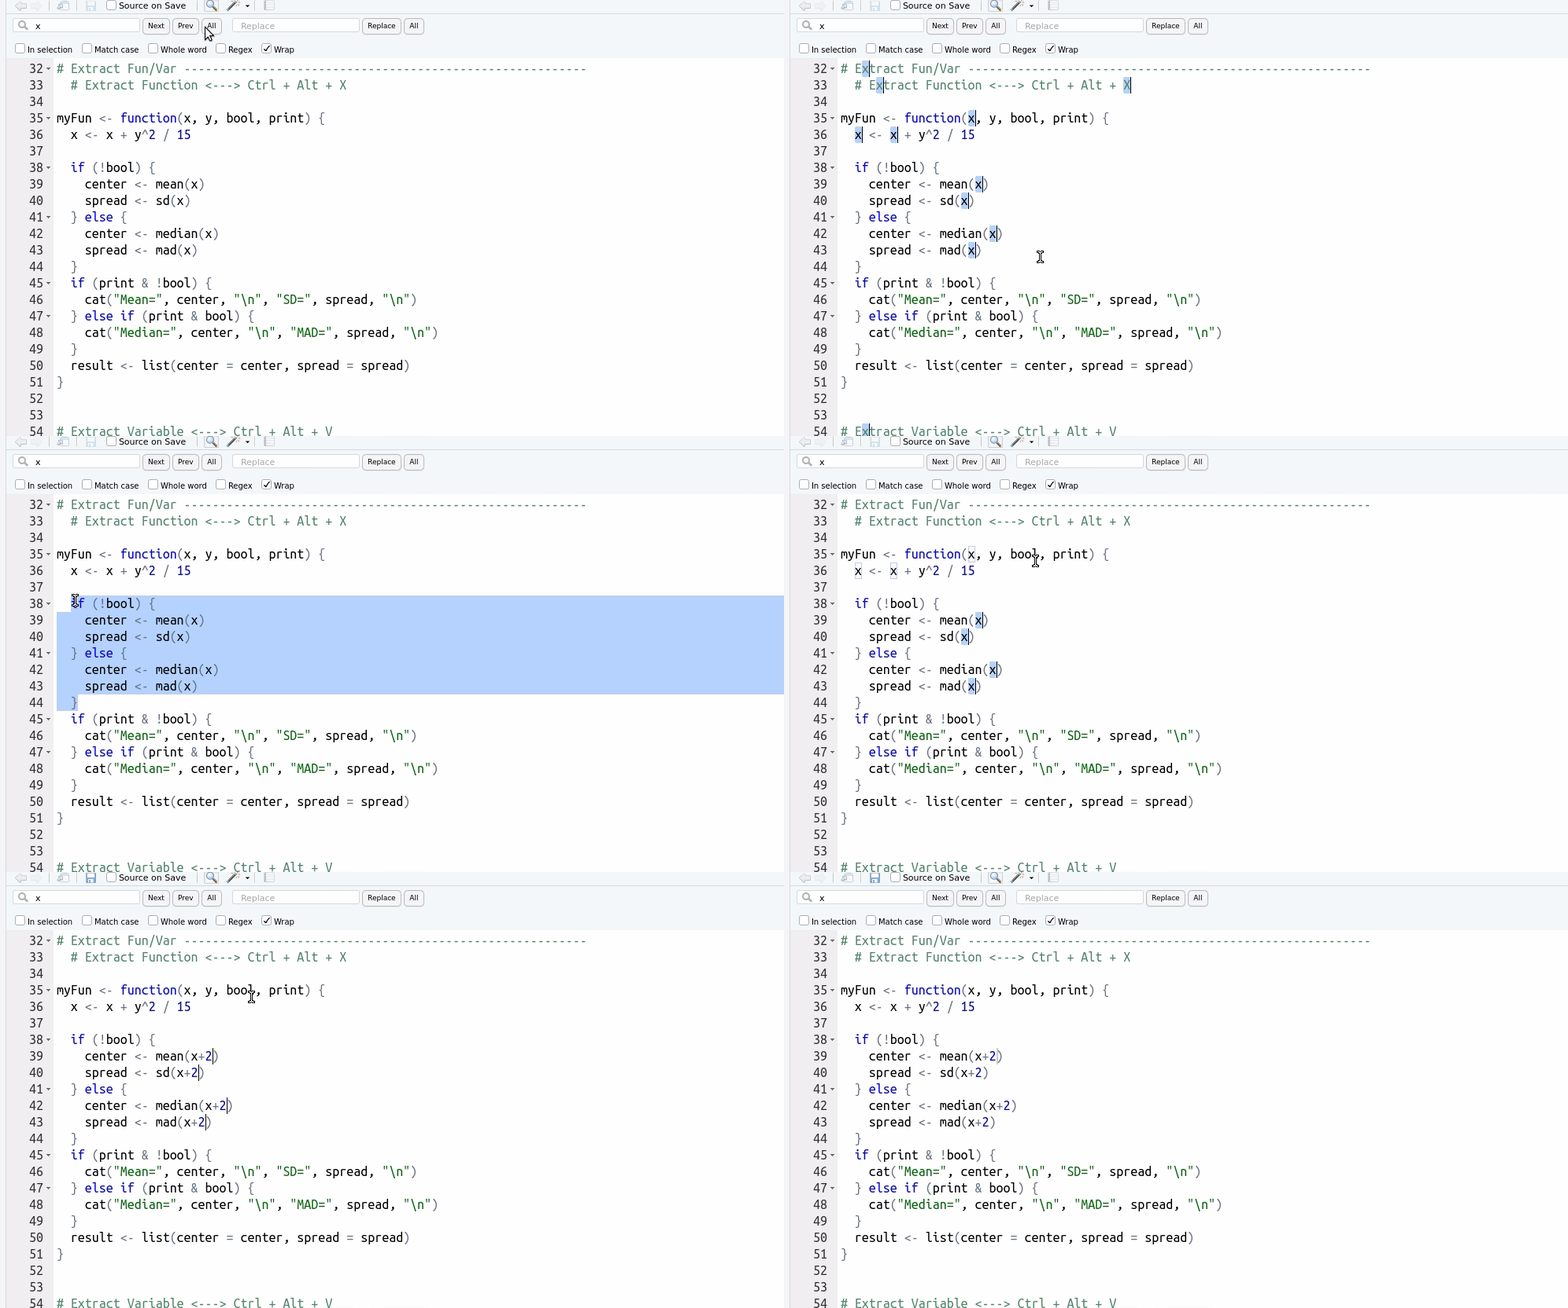
If you want to search only inside an active source tab you can use the find bar with Ctrl + F. It brings several additional options like replacing texts and searching inside a selected part of code only. It can also be useful for multiple cursor editing, which we’ll discuss in the section below.
We’ve covered more methods in an additional RStudio article – search within console history and search through your tabs. You can refer to it if you want to get more details on those.
With R Shiny you can build beautiful, interactive web apps. Discover the possibilities with Appsilon’s Shiny Demos.
How to Edit With Multiple Cursors in RStudio
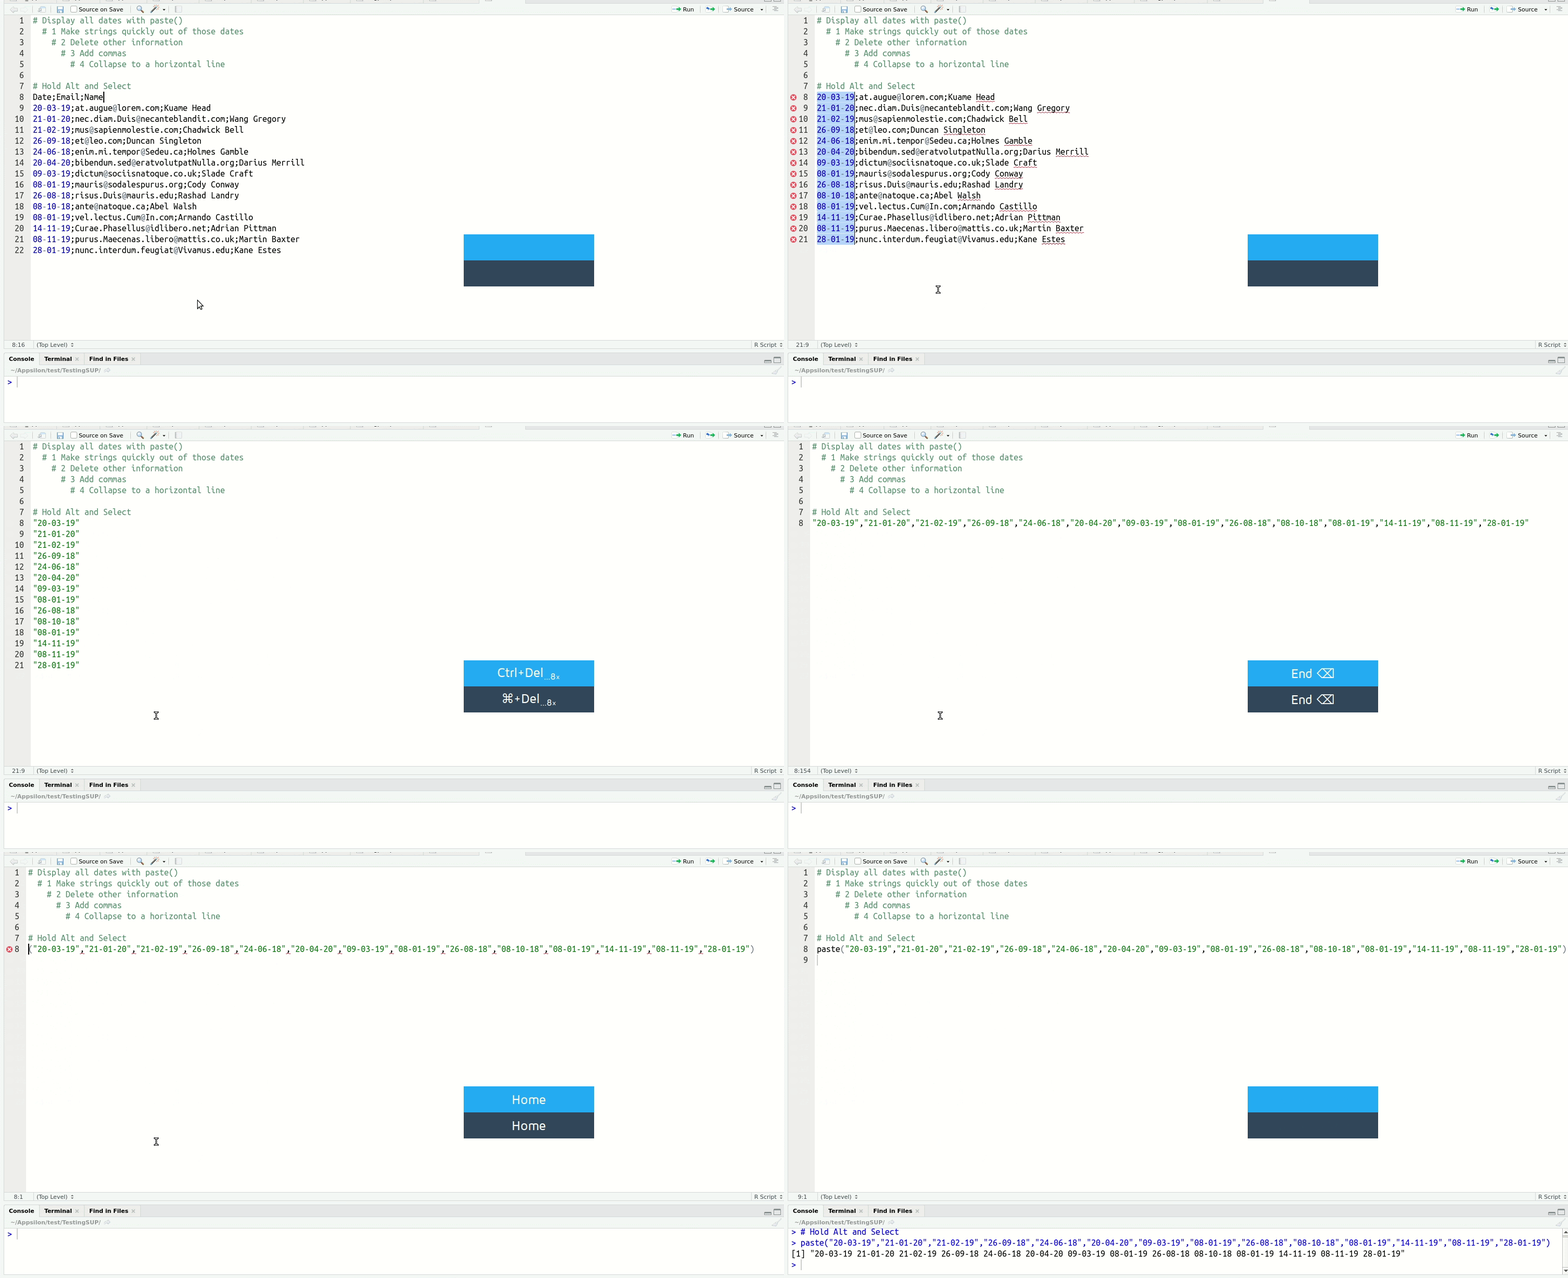
In RStudio, you can write and edit in more than one place at a time with multiple cursors. Press Ctrl + Alt + (Up/Down) to create a new cursor in the direction in which you press. If you want to quickly select more lines use Alt and drag with the mouse to create a rectangular selection, or Alt + Shift and click to create a rectangular selection from the current cursor position to the clicked position.
This way of editing may look intimidating at first, and may not be easy to operate initially. However, knowing it is there can save you time when you encounter repetitive multi-line tasks. Try playing around with using multiple cursors and see how it feels.
Below you can see an example of how using multiple cursors might look:
Another way is to use the Find/Replace toolbar from the previous paragraph to place multiple cursors. Just search for a phrase and press the All button to select all matching items. It will create a cursor for each matching phrase. If you don’t want to search throughout the entire file you can also limit the area for a searched phrase by selecting a part you are interested in and checking the box with the “In selection” option.
How to Use R Addins
R Addins are a broad topic that deserves an article on its own. We’ll give you a brief introduction to the concept.
What are R addins?
R Addins allow you to execute R functions in an interactive way right from RStudio. Addins are distributed as R packages and can be launched either through the Addins dropdown on the toolbar or through assigned keyboard shortcuts.
We distinguish two types of addins:
- Text macros – They insert text into the console/source pane or can transform text within the source pane.
- Shiny Gadgets – Interactive Shiny applications launched inside RStudio which may also perform transformations like text macros, but their possibilities are much more extensive.
Testing out some addins
To quickly try addins you can install some examples from RStudio Github.
devtools::install_github("rstudio/addinexamples", type = "source")
It will give you a text macro for inserting %in% operator, as well as three shiny gadgets for a small sneak, peek of what’s possible.
As we mentioned, you can assign a keyboard shortcut to an addin the same way as you do it with regular shortcuts. You can find them easily by filtering “Addin” (all of them have their scope set like that).
Make your own R addins
If you want to check out more of them try the addinslist package by Dean Attali.
If you would like to create your own addins, you can find more information on how to do it here.
RStudio IDE and Python – Best Tips and Tricks
If you’re working on a project that primarily uses R with occasional Python scripts, RStudio should be your IDE of choice. Go to File -> New File -> Python Script to create a new Python file.
How to run Python scripts from R
Create a new Python script in RStudio – we’ve named ours pyscript.py. It prints the sum of two numbers:
if __name__ == '__main__':
  x = 5
  y = 10
  print(f"{x} + {y} = {x + y}")
To run the script from R, you have to import the reticulate package and call the run_py_file() function with the path of the Python script provided as an argument:
library(reticulate)

py_run_file("")
How to call Python in R scripts
It’s recommended to use the reticulate package when you’re writing the code in both R and Python, but R is the dominant language. In the opposite case, opt for rpy2.
The following code snippet shows you how to create a crosstab from the MTCars dataset, convert it into a Pandas DataFrame, and then back to R:
library(reticulate)

# Import Pandas module
pd <- import(module = "pandas", as = "pd", convert = FALSE)

data <- mtcars

# From R to Python
mtcars_crosstab <- pd$crosstab(
  index = data$cyl,
  columns = data$gear
)

# From Python to R
mtcars_crosstab_r <- py_to_r(mtcars_crosstab)
Use different Python environment
Functions use_virtualenv() and use_condaenv() functions enable you to specify versions of Python in virtual or conda environments. Here’s how to use them:
library(reticulate)
use_virtualenv("myenv")
use_condaenv("myenv")
Bonus RStudio Tips
Tip: Use vim settings
Keep your hands in one place! It’s a powerful method for programmers. Examples: dd to delete the whole line, 7dd to delete 7 lines, navigate, macros, jumping around whole words instead of letters.
Tip: Use .RProfile
When you develop an R package, it’s useful to load frequently used dev packages in the .RProfile file (placed in the main package directory). For example:
library(devtools)
library(testthat)
This way you can use functions like test(), check() without specific package reference or loading the packages on your own.
Tip: Increase security with .Renviron
Do not keep credentials inside your project code. A good practice is to keep them “gitignored” inside the .Renviron file:
db_password=MySecretPassword
And use a variable in the code with Sys.getenv("db_password").
Tip: Use Docker
If you want to keep a consistent environment for your project development within a team, use a dockerized version of RStudio (https://hub.docker.com/r/rocker/rstudio/).
Tell Us About Your RStudio Shortcuts and Tips
There is obviously plenty more to explore on the topic of improving your RStudio workflow, and we hope you are inspired to pursue further exploration and experiment on your own. If you end up with something useful as a result – be it a code snippet, an addition, or just something useful that we did not mention here, please share it as a comment below. We’ll be updating this page regularly with more RStudio shortcuts and tips.
If you’re interested in making more out of your data, check out how Appsilon builds the world’s most advanced R Shiny Dashboards. And be sure to sign-up for updates on Appsilon’s R and Shiny educational blog. We provide the R community with the best tools, tips, shortcuts, and open-source packages to make the most out of your data science needs.
Related RStudio Reads
- RStudio Shortcuts and Tips
- RStudio Shortcuts and Tips part 2
- Top Tips for RStudio Workbench and Desktop
Further Reading
If you’re looking for more R tutorials, try these out:
