

 Share
Share Tweet
Tweet Share
Share


How to Deploy RStudio (Posit) Workbench to AWS Using Terraform

26 September 2021
If you’re searching for Cloud services, it’s safe to assume you know about Amazon Web Services (AWS). The AWS cloud platform is arguably the most popular cloud provider, contending its place among the likes of Azure, Google, and IBM. AWS offers a large set of cloud-based products including databases, computing, developer tools, and enterprises applications. With the right platform and the right tools, you can improve operational efficiency, minimize risk, and quickly scale projects. But not all platforms are made equal and depending on the needs of the project and programs used by your team, you might find other platforms a more viable solution. However, in this tutorial, we’ll deploy RStudio Workbench to AWS by using Terraform, an infrastructure-as-code tool that can be used to model cloud structure via code.
RStudio Workbench is a powerful tool for creating data science insights. Whether you work with R or Python, Workbench makes developer’s life easier from team collaboration on centralized servers and server access control to authentication and load balancing. You can learn about the many benefits of Workbench over open-source RStudio Server by reading the Workbench documentation (previously RStudio Server Pro).
Struggling to find tools for managing distributed teams? Appsilon uses RStudio Connect as a solution for remote teams.
Continue reading to use Terraform to deploy RStudio Workbench to AWS. And discover how you can close the gap between your current DevOps and what’s possible through digital transformation.
Note: At the time of writing this article, Posit PBC was RStudio PBC. We use RStudio and Posit interchangeably in this text (e.g. RStudio Workbench == Posit Workbench).
Using Packer to build an AMI
Packer is a free and open-source tool for creating golden images for multiple platforms from a single source configuration.
Pre-requisites
Before you can run packer to build images, you’ll need a few pre-requisites.
- Python 3.9.6+
- git v2.30.1+
- packer v1.7.3+
- aws-cli v2.0+
- aws-vault v6.3.1+
- ansible v2.11.1
- Access to the AWS account where the images will be built
Variables
The following environment variables should be set before running packer:
- AWS Credentials
AWS_ACCESS_KEY_IDAWS_SECRET_ACCESS_KEY
We suggest using aws-vault for managing AWS profiles and setting these variables automatically.
Store AWS credentials for the appsilon profile:
Execute a command (using temporary credentials):
Clone repository
Make sure git is installed and then clone the repository with the Packer configuration files for building RStudio Workbench.
Fetch Ansible roles defined in requirements.yml by running the following command:
Next, run the command below to validate AMI:
You should see no output if files have no issues.
Template file: ami.pkr.hcl
The table below describes the purpose of variables used by ami.pkr.hcl template.
| Variable | Purpose |
|---|---|
aws_region | controls where the destination AMI will be stored once built. |
r_version | Version of R to install on AMI. |
rstudio_version | Version of RStudio Workbench to install on AMI. |
Some configuration blocks used in the template file and their purpose:
sourceis used to define the builder Packer will use. In our case, it is theamazon-ebsbuilder which is able to create Amazon AMIs backed by EBS volumes for use in EC2. More information: Amazon EBS – Builders | Packer by HashiCorp.source_ami_filterdefines which AMI to use as a base image for our RStudio Workbench image –ubuntu/images/*ubuntu-focal-20.04-amd64-server-*. Beware that theownersfilter is set to official Canonical Group Limited supplier which is the company behind Ubuntu base AMIs. This way we can ensure the proper image is being used.provisionerstanza is used to install and configure third-party software on the machine image after booting. Provisioners prepare the system for use, so in our case, we installansibleand somepythondependencies first, and next, we executeansible-playbookto install and configure R and RStudio Workbench on the system. By supplyingvar.r_versionandvar.rstudio_version(default values defined in./example.auto.pkvars.hcl) as extra arguments we can control which versions of corresponding components will be installed.
Building Packer image
- Make sure all the required software (listed above) is installed,
- Load your AWS credentials into your environment using
aws-vaultand runpacker build:
It will take around 15 minutes for the image to be generated. Once the process is completed, you’ll see the image under Services -> EC2 -> AMIs.
The AMI ID will be output at the end.

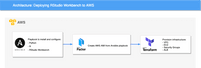
Using Terraform to deploy RStudio (Posit) Workbench to AWS
Terraform is an infrastructure as code (IaC) tool that allows you to build, change, and version infrastructure safely and efficiently. You can run Terraform on several operating systems including macOS, Linux, and Windows. To see the full list explore the Terraform download documentation.
Is your enterprise missing out on AI innovations? Maybe it’s time to build an AI model for your business.
Pre-requisites
Before you can run Terraform to deploy RStudio Workbench to AWS, you’ll need the following pre-requisites:
- terraform v1.0.0+
- Access to the AWS account where the RStudio Workbench will be deployed
Write configuration
The set of files used to describe infrastructure in Terraform is known as a Terraform configuration. You will write your first configuration to create a single RStudio Workbench instance, but prior to that you will have to create resources like:
- VPC
- Security Group
Each Terraform configuration must be in its own working directory. Create a directory for your configuration first.
Change into the directory.
Create a file to define your initial Terraform configuration:
Open terraform.tf in your text editor, paste in the configuration below, and save the file.
The terraform {} block contains Terraform settings, including the required providers Terraform will use to provision your infrastructure. For each provider, the source attribute defines an optional hostname, a namespace, and the provider type. Terraform installs providers from the Terraform Registry by default. In this example configuration, the AWS provider’s source is defined as hashicorp/aws, which is shorthand for registry.terraform.io/hashicorp/aws (Build Infrastructure | Terraform – HashiCorp Learn). required_version specifies a minimum required version of Terraform to be installed on your machine.
VPC
Create a file to define your VPC.
Open vpc.tf in your text editor, paste in the configuration below, and save the file.
We are using a community Terraform module that creates VPC resources on AWS. We specify some custom parameters, like vpc_name, vpc_cidr and region in which the resources shall be created. For more information on how this module works, make sure to read module documentation.
Security groups
Create a file to define your security groups, which will act as a virtual firewall for your RStudio Workbench instances to control incoming and outgoing traffic.
Open sg.tf in your text editor, paste in the configuration below, and save the file.
We are using a community Terraform module that creates security group resources on AWS. We specify some custom parameters, like vpc_id from vpc.tf file where we defined our VPC in the previous step, security group name, ingress, and egress rules.
We allow all incoming connections on ports 80, 443, 22 (SSH), 8787 (default RStudio Workbench port) and also allow for ICMP requests. We allow all outgoing connections so that our instance can reach out to the internet. For more information on how this module works, make sure to read module documentation.
EC2
Create a file to define your RStudio Workbench and EC2 instance.
Open ec2.tf in your text editor, paste in the configuration below, and save the file.
We use aws_ami as a data source to get the ID of RStudio Workbench AMI we built using Packer previously. aws_key_pair provides an EC2 key pair resource. A key pair is used to control login access to EC2 instances. We need to specify a path to a public SSH key on our local workstation so that later we can connect to our EC2. Use Amazon’s guide on generating keys to create an SSH key in case you do not have any yet.
We are also using a community Terraform module that creates an EC2 resource on AWS. We specify some custom parameters, like:
instance_count– number of instances to runami– an ID of RStudio Workbench AMIinstance_type– the flavor of our server (refer to instance types for available types and pricing)subnet_ids– network subnets to run the server in (created invpc.tfpreviously)key_name– SSH key to associate with the instancevpc_security_group_ids– a list of security groups that should be associated with our instanceassociate_public_ip_address– a boolean flag that indicates whether a publicly accessible IP should be assigned to our instance, we set this totrueto be able to access our RStudio Workbench over the internetroot_block_device– a configuration block to extend default storage for our instance
For more information on how this module works, make sure to read the module documentation.
Optional: Application Load Balancer
Optionally, we can create an ALB (Application Load Balancer), a feature of Elastic Load Balancing that allows a developer to configure and route incoming end-user traffic to applications based in the AWS public cloud. In case you have a custom domain – we can use ALB to configure access to RStudio Workbench over a human-friendly DNS record, something like https://workbench.appsilon.com. To do so, create a file alb.tf:
Open alb.tf in your text editor, paste in the configuration below and save the file.
We are using the ACM community Terraform module here. The module creates an ACM certificate and validates it using Route53 DNS. ACM modules rely on aws_route53_zone data retrieved from your account, hence we need to specify the existing zone name here. The module documentation contains pertinent information and updates. The rest of the file configures https access to our RStudio Workbench instance defined in ec2.tf. creates a load balancer, and a human-friendly DNS entry. All http access will be redirected to https.
Initialize the directory
When you create a new configuration — or check out an existing configuration from version control — you need to initialize the directory with terraform init.
Initializing a configuration directory downloads and installs the providers defined in the configuration, which in this case is the aws provider.
Initialize the directory.
Next, execute terraform validate to make sure the configuration is valid.
Create infrastructure
Apply the configuration now with the aws-vault exec appsilon -- terraform apply command. Terraform will print output similar to what is shown below. We have truncated some of the output to save space.
Beware:
applycommand should be executed from withinaws-vaultenvironment so that Terraform can access your AWS account.
Before it applies any changes, Terraform prints out the execution plan which describes the actions Terraform will take in order to change your infrastructure to match the configuration.
Terraform will now pause and wait for your approval before proceeding. If anything in the plan seems incorrect or dangerous, it is safe to abort here with no changes made to your infrastructure.
In this case, the plan is acceptable, so type yes at the confirmation prompt to proceed. Executing the plan will take a few minutes since Terraform waits for the EC2 instance to become available.
You have now created infrastructure using Terraform! Visit the EC2 console and find your new instance up and running. Use the EC2 console to grab the IP address in case you would want to connect to it over SSH.
Note: Per the
awsprovider block, your instance was created in theeu-west-1region. Ensure that your AWS Console is set to this region.
You can also access your RStudio Workbench instance directly over IP or over DNS (if deployed with optional part – Application Load Balancer).
Demo

Destroying infrastructure
The terraform destroy command terminates resources managed by your Terraform project. This command is the inverse of terraform apply in that it terminates all the resources specified in your Terraform state. It does not destroy resources running elsewhere that are not managed by the current Terraform project. Use it with precautions to remove the AWS resources you have created during this tutorial to reduce your AWS bill.
Beware:
destroycommand should be executed from withinaws-vaultenvironment so that Terraform can access your AWS account.
Repository with Code
You can find the complete example of the Terraform code above in Appsilon’s Github repo Terraform AWS RStudio Workbench example.
Empower your team through DevOps in the cloud
Whether you’re well entrenched in your cloud transformation or are just starting out, the most important thing you can do is keep learning. DevOps through the cloud can improve agility and time to market, but there’s always room for improvement. You might consider decoupling applications from physical resources and designing them to be cloud-native. Or make the most of RStudio Workbench by automating performance testing to validate efficient use of resources. You can also be selective when migrating existing applications to prioritize and make sure the cost is justified.
And when in doubt, it’s always advisable to seek guidance to ensure your project is set up with the right tools, provide DevOps and cloud training, and make sure a proper framework is in place. If you’re not sure how to proceed, reach out to Appsilon. Appsilon has a well-balanced team of R/Shiny specialists, frontend developers, full-stack engineers, DevOps, and business analysts with years of experience developing ML frameworks and data science solutions for Fortune 500 companies. We enjoy solving tough enterprise challenges and understand that unique problems require custom solutions.
Contact Us
Project Manager

Get Updates
Subscribe to Shiny Weekly Newsletter
Join 4000+ Shiny enthusiasts to see the latest Shiny news from the R community.
Also on aws
