

RStudio Package Tests – From Theory to Implementation in R and Python


 Share
Share Tweet
Tweet Share
ShareLet’s face it – the technical aspect of writing R and Python packages from scratch isn’t complicated. However, the challenging part lies in proper testing. The goals with package tests are to ensure the package works properly and without any bugs on the client’s hardware and that the correct dependency versions are used. To do this, we use the RStudio IDE.
Today you’ll learn how to write RStudio package tests for Python and R packages, and you’ll also learn how to run and package them. Yes, we’ll use RStudio for both R and Python. R naturally has better support, but Python is catching up fast. Toward the end of the article, we’ll share a couple of tips and tricks regarding package tests and testing in general. Let’s get started!
Interested in Testing in Shiny? Read our comprehensive guide on shinytest2 vs Cypress.
Table of contents:
- Package Tests and RStudio IDE – Why RStudio?
- R Tests in RStudio with testthat
- Python Tests in RStudio with PyTest
- Package Tests and RStudio IDE – Tips & Tricks
- Summing up Tests and RStudio IDE
Package Tests and RStudio IDE – Why RStudio?
RStudio is an Integrated Development Environment (IDE) explicitly tailored for R – a programming language for statistical computing and graphics. With their recent rebrand to Posit, the company aims to be more Python-friendly and deliver a single data science ecosystem for R and Python.
In other words, the name “RStudio” is a tad confusing if you’re supporting both R and Python, hence the rebranding.
If you’re familiar with R, you know that RStudio makes it really simple to test R functions and packages. Today we’ll show you how to do both R and Python package tests in RStudio.
But first, what really is a package test, and what is a package?
What is a Package?
A package/library/module is a common name for a collection of prewritten code you can use to solve a certain issue without writing everything from scratch. Think of ggplot2 package in R, or matplolib library in Python – they both offer amazing data visualization support through a set of built-in functions. In addition, you can also tweak just about every aspect with these two packages.
Would you care to write them from scratch? Maybe, but it would take you months of dedicated work to come close, and oftentimes the projects you’re working on have a strict and short deadline. That’s where packages come in handy.
Now, the package you write can implement any programming logic you want. It can be as simple as printing “Hello, world” to the screen, or as complex as training neural network models. There’s no minimum requirement for the problem complexity or the number of lines of code.
What are Package Tests?
Once you have the programming logic figured out, you’ll want to test it against every scenario you can imagine. It’s a good practice to write tests for your functions and packages, so you can guarantee nothing will break after adding some functionality in future releases or modifying the way something works.
R and RStudio have excellent support for package tests with testthat. It’s an R package you’ll learn how to use in the following section.
R Tests in RStudio with testthat
We’ll start by creating a new R package. Open RStudio, set a working directory to a location you want to save the package, and in the console run the following command:
devtools::create("myrpackage")You should see an output similar to this one:
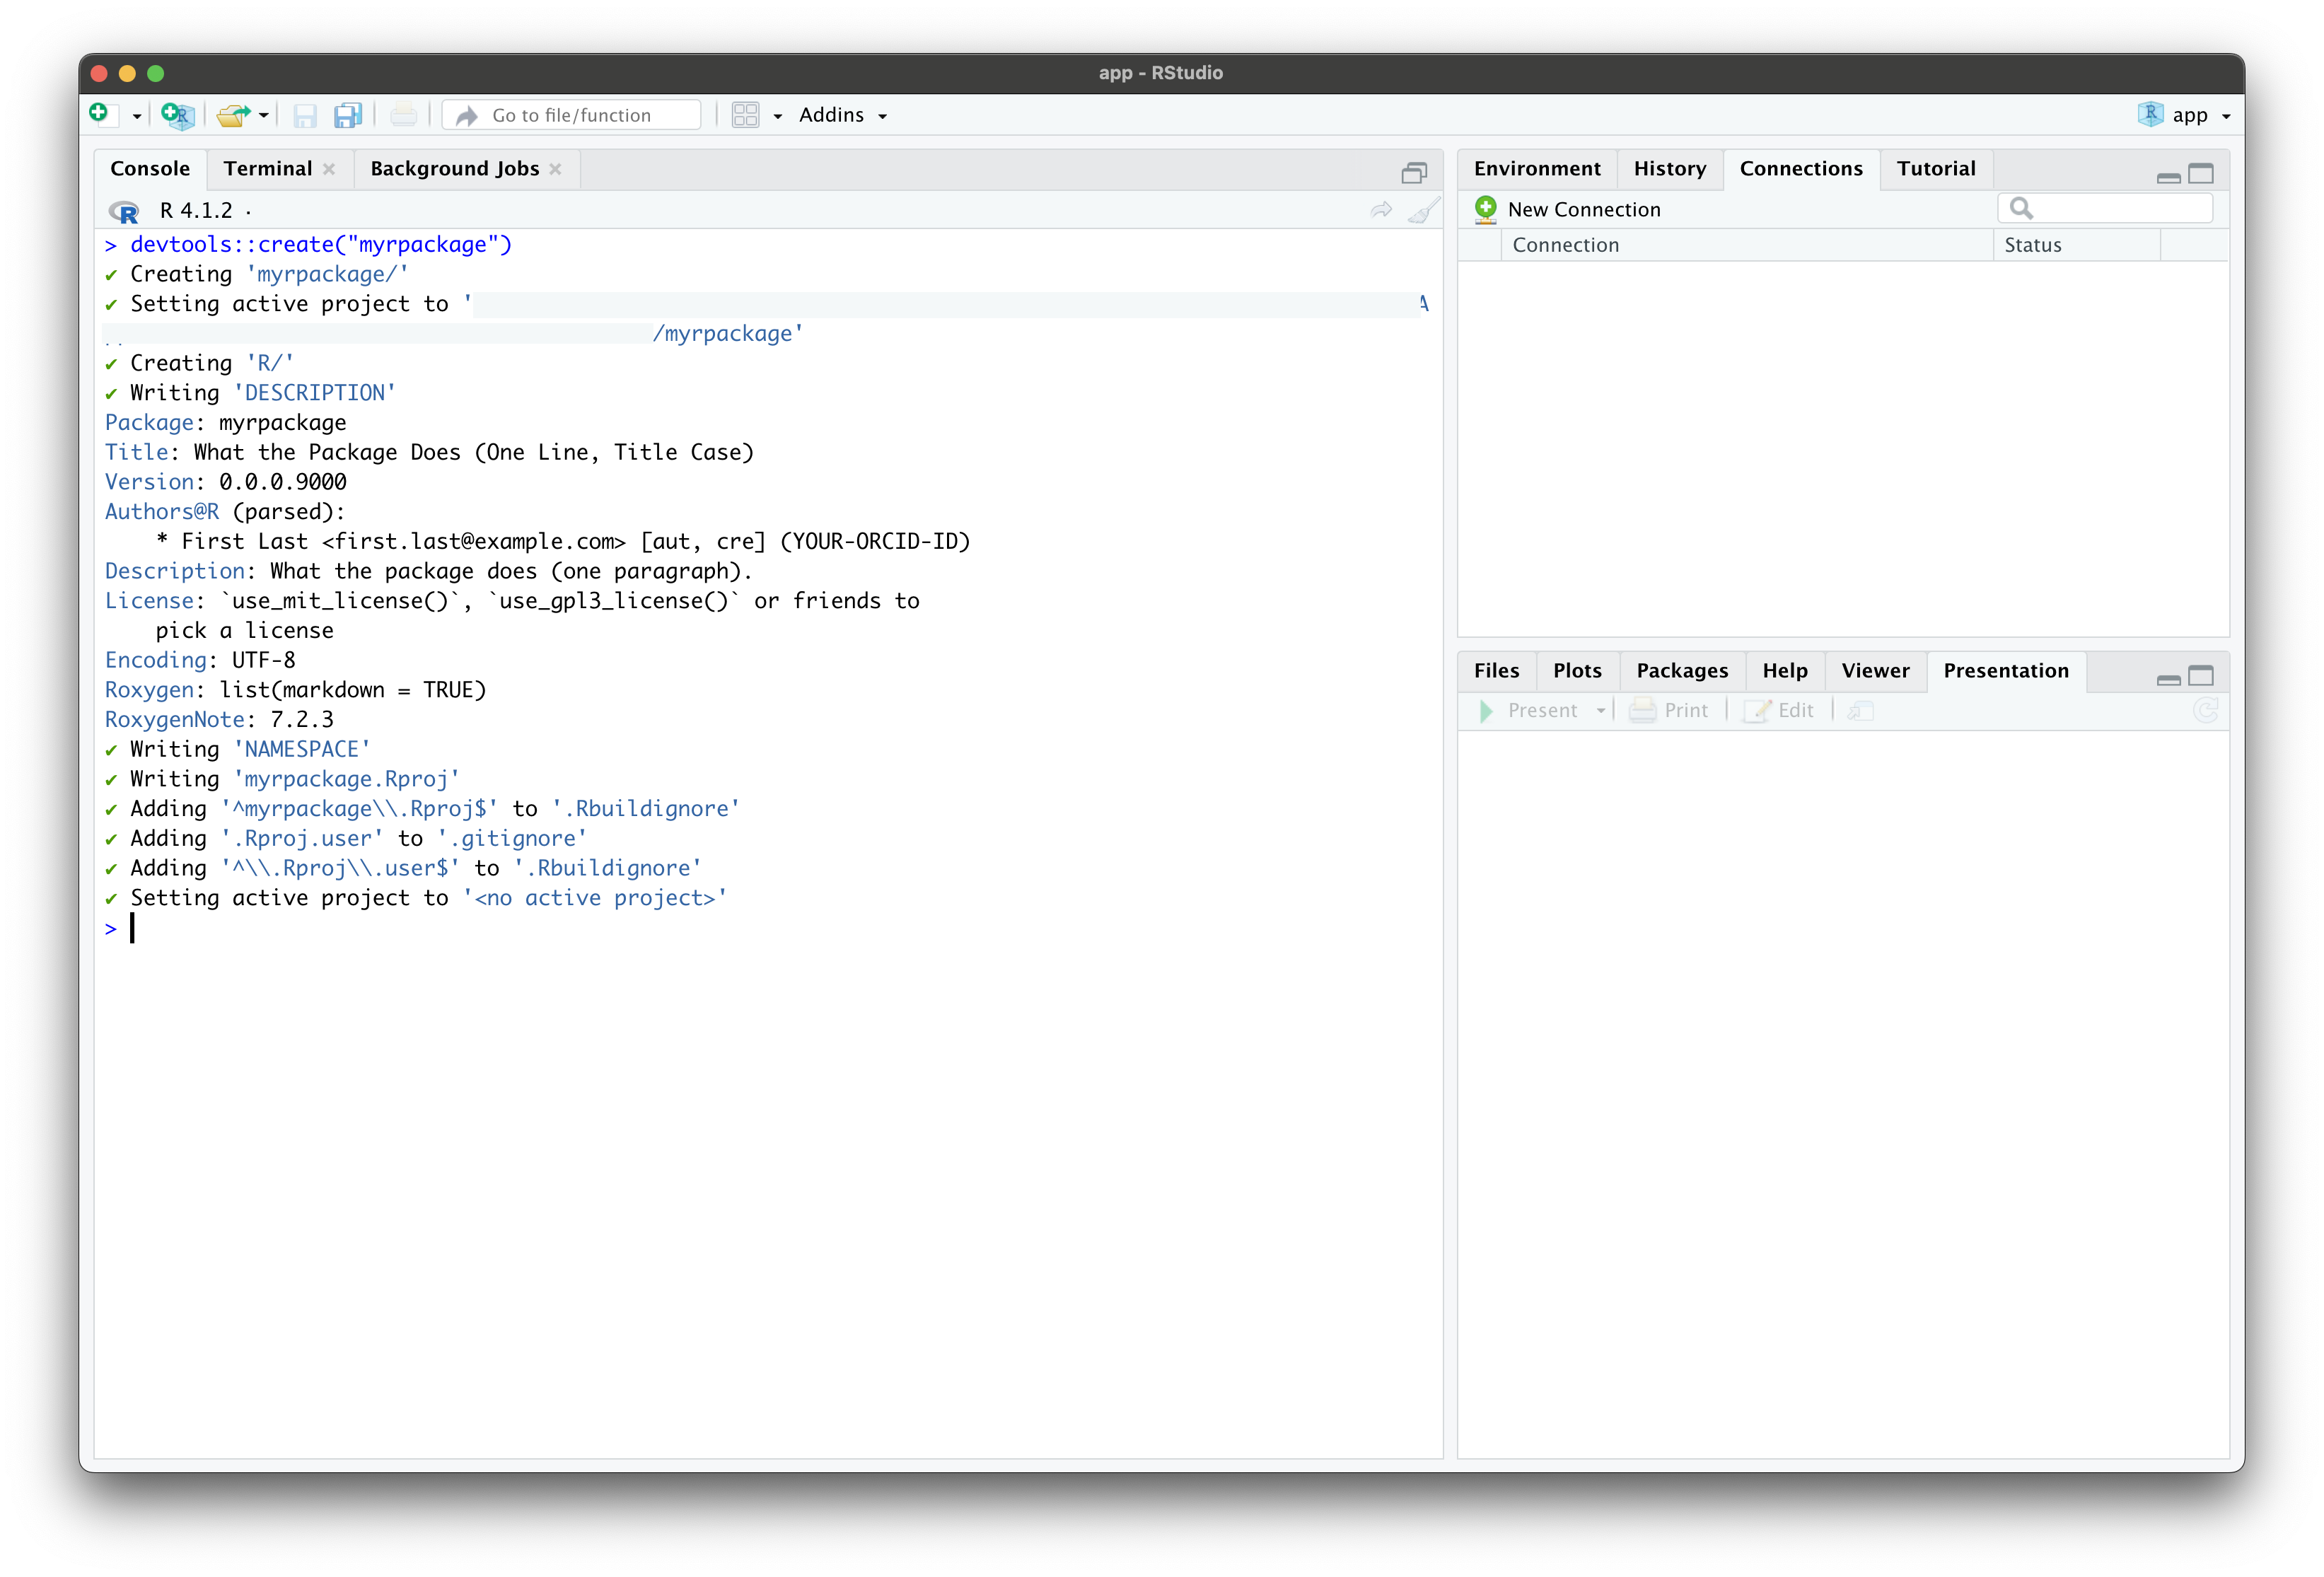
Image 1 – Creating a new R package with devtools
Feel free to replace myrpackage with whatever name you see fit, of course. You’ll see the following directory structure after running the above command:

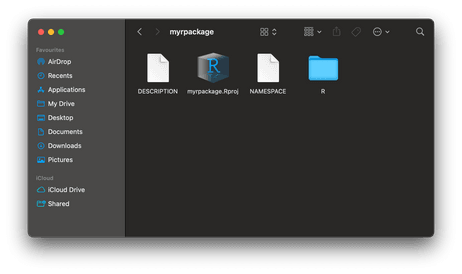
Image 2 – R package directory structure
Let’s go over the responsibilities of each file and folder:
R/– A folder in which all of your R files will go.NAMESPACE– Manages what needs to be exposed to users of your R package.devtoolswill take care of the changes for you, and it’s unlikely you’ll ever have to edit this file manually.DESCRIPTION– Your package metadata, such as package name, version, description, author info, license, and so on. We’ll use it shortly to add R dependencies.myrpackage.Rproj– RStudio-specific file attached to the project.
Okay, we have the package configured, so now let’s write some R functions.
R Functions and Dependencies
As said previously, all R code will live in the R/ folder. Create a my_functions.R file inside it, and paste the following three functions:
sum_nums <- function(a, b) {
  return(a + b)
}

sum_nums_err <- function(a, b) {
  return(a + b + 5)
}

get_users <- function(url) {
  req <- httr::GET(url = url)
  res <- httr::content(req, as = "text", encoding = "UTF-8")
  parsed <- jsonlite::fromJSON(res)
  return(parsed$data)
}
The functions are utterly simple – the first two are used to add numbers (the second function adds a constant to the sum), and the last function makes an API request to a URL and returns the content.
You can see how we haven’t imported the packages using the library() function, and that’s deliberate. You should never explicitly import R packages in your own package, but instead, use the double colon notation (::).
Now it’s time to address dependencies. Inside the DESCRIPTION file, add the following section:
Imports:
    httr (>= 1.4.4),
    jsonlite (>= 1.8.4)
You can always check the version installed on your system by running packageVersion("packageName") from the R console. In the end, the DESCRIPTION file should look like this:

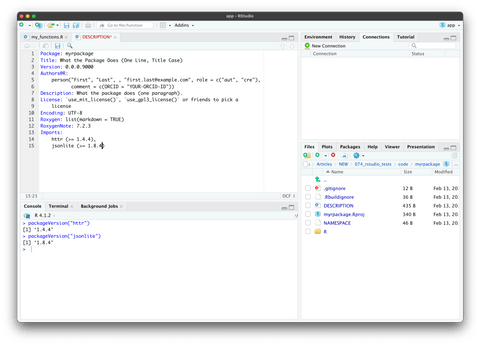
Image 3 – The package DESCRIPTION file
We now have the function logic and package dependencies out of the way, so next, let’s focus on package tests in RStudio.
Getting Started with R Package Tests
We mentioned earlier that we’ll use testthat R package to manage the testing. You’ll have to install it first, so do that with the following command:
install.packages("testthat")Once installed, you can tell the package you want to use testthat:
usethis::use_test(3)The 3 passed in as a parameter instructs R that the name argument for naming the test function should be “3”. Versioning of testthat (at the time of writing 3 was the latest version) is handled implicitly by usethis::use_testthat_impl() or when usethis::test_that() is used to set-up a tests directory.

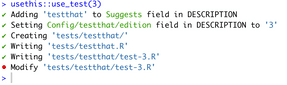
Image 4 – Using testthat in a custom R package
The last R console command will create a folder tests/, which contains a file named testthat.R and a folder with the same name. Further, the folder contains a test file that usethis::use_test(3) created because of our name argument.
Automated Test Files
Creating a test file is automated by usethis::use_test() when a name is not specificed and the file we want to test is the current script open.
To do so, follow these steps:
1. Make sure my_functions.R is the active file (i.e. the current tab in the source pane)
2. Run usethis::use_test()
3. tests/testthat/test-my_functions.R should be created
Manual Test Files
Now let’s create your test file manually.
In tests/testthat/ create a new R file named test_my_functions.R. In general, the manual test files should have a prefix test_, followed by the name of your R script.
Once the file is created, paste the following R code inside:
library(testthat)

test_that("sum_nums tests", {
  expect_equal(sum_nums(5, 10), 15)
  expect_equal(sum_nums(5, -10), -5)
  expect_equal(sum_nums(3 * 5, 5 * 5), 40)
})

test_that("sum_nums_err tests", {
  expect_equal(sum_nums_err(5, 10), 15)
  expect_equal(sum_nums_err(5, -10), -5)
  expect_equal(sum_nums_err(3 * 5, 5 * 5), 40)
})

test_that("get_users tests", {
  expect_type(get_users("https://dummy.restapiexample.com/api/v1/employees"), "list")
  expect_type(get_users("https://dummy.restapiexample.com/api/v1/employees"), "data.frame")
  expect_length(get_users("https://dummy.restapiexample.com/api/v1/employee/1"), 1)
})
These three code blocks will run a couple of tests. The first block should always pass since the values of passed-in parameters are summed correctly. The second block should always fail since we’ve just copied the test conditions. Remember that the sum_nums_err() function adds 5 to the number sum. The third block will fail on the second test since the return type of the get_users() function is a list.
Overall, you should have the following package directory structure before proceeding:
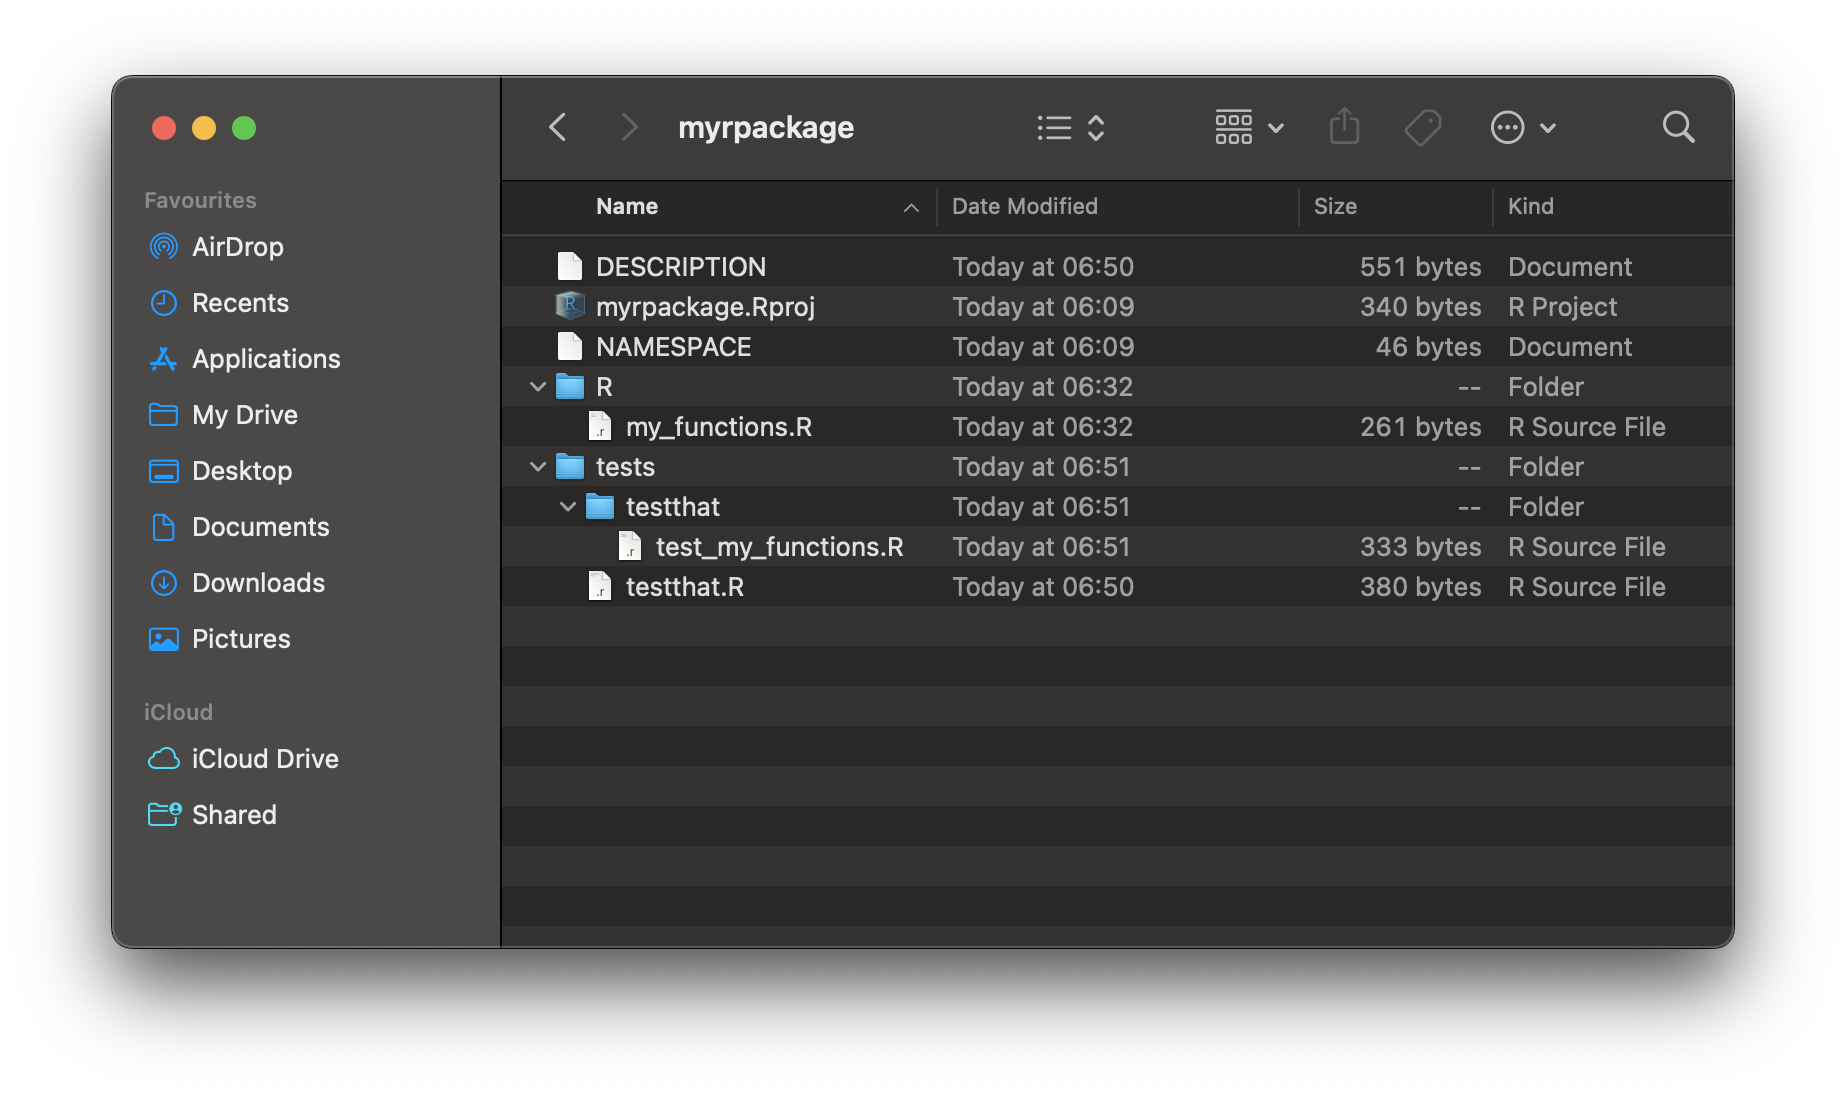
Image 5 – Directory structure after adding the test files
And now it’s finally time to run R package tests in RStudio.
Run R Package Tests in RStudio
RStudio will automatically figure out you’re in a test file. You can verify that by inspecting the options in the top panel – you’ll see the “Run Tests” button. Click on it, and you’ll see the following after a couple of seconds:
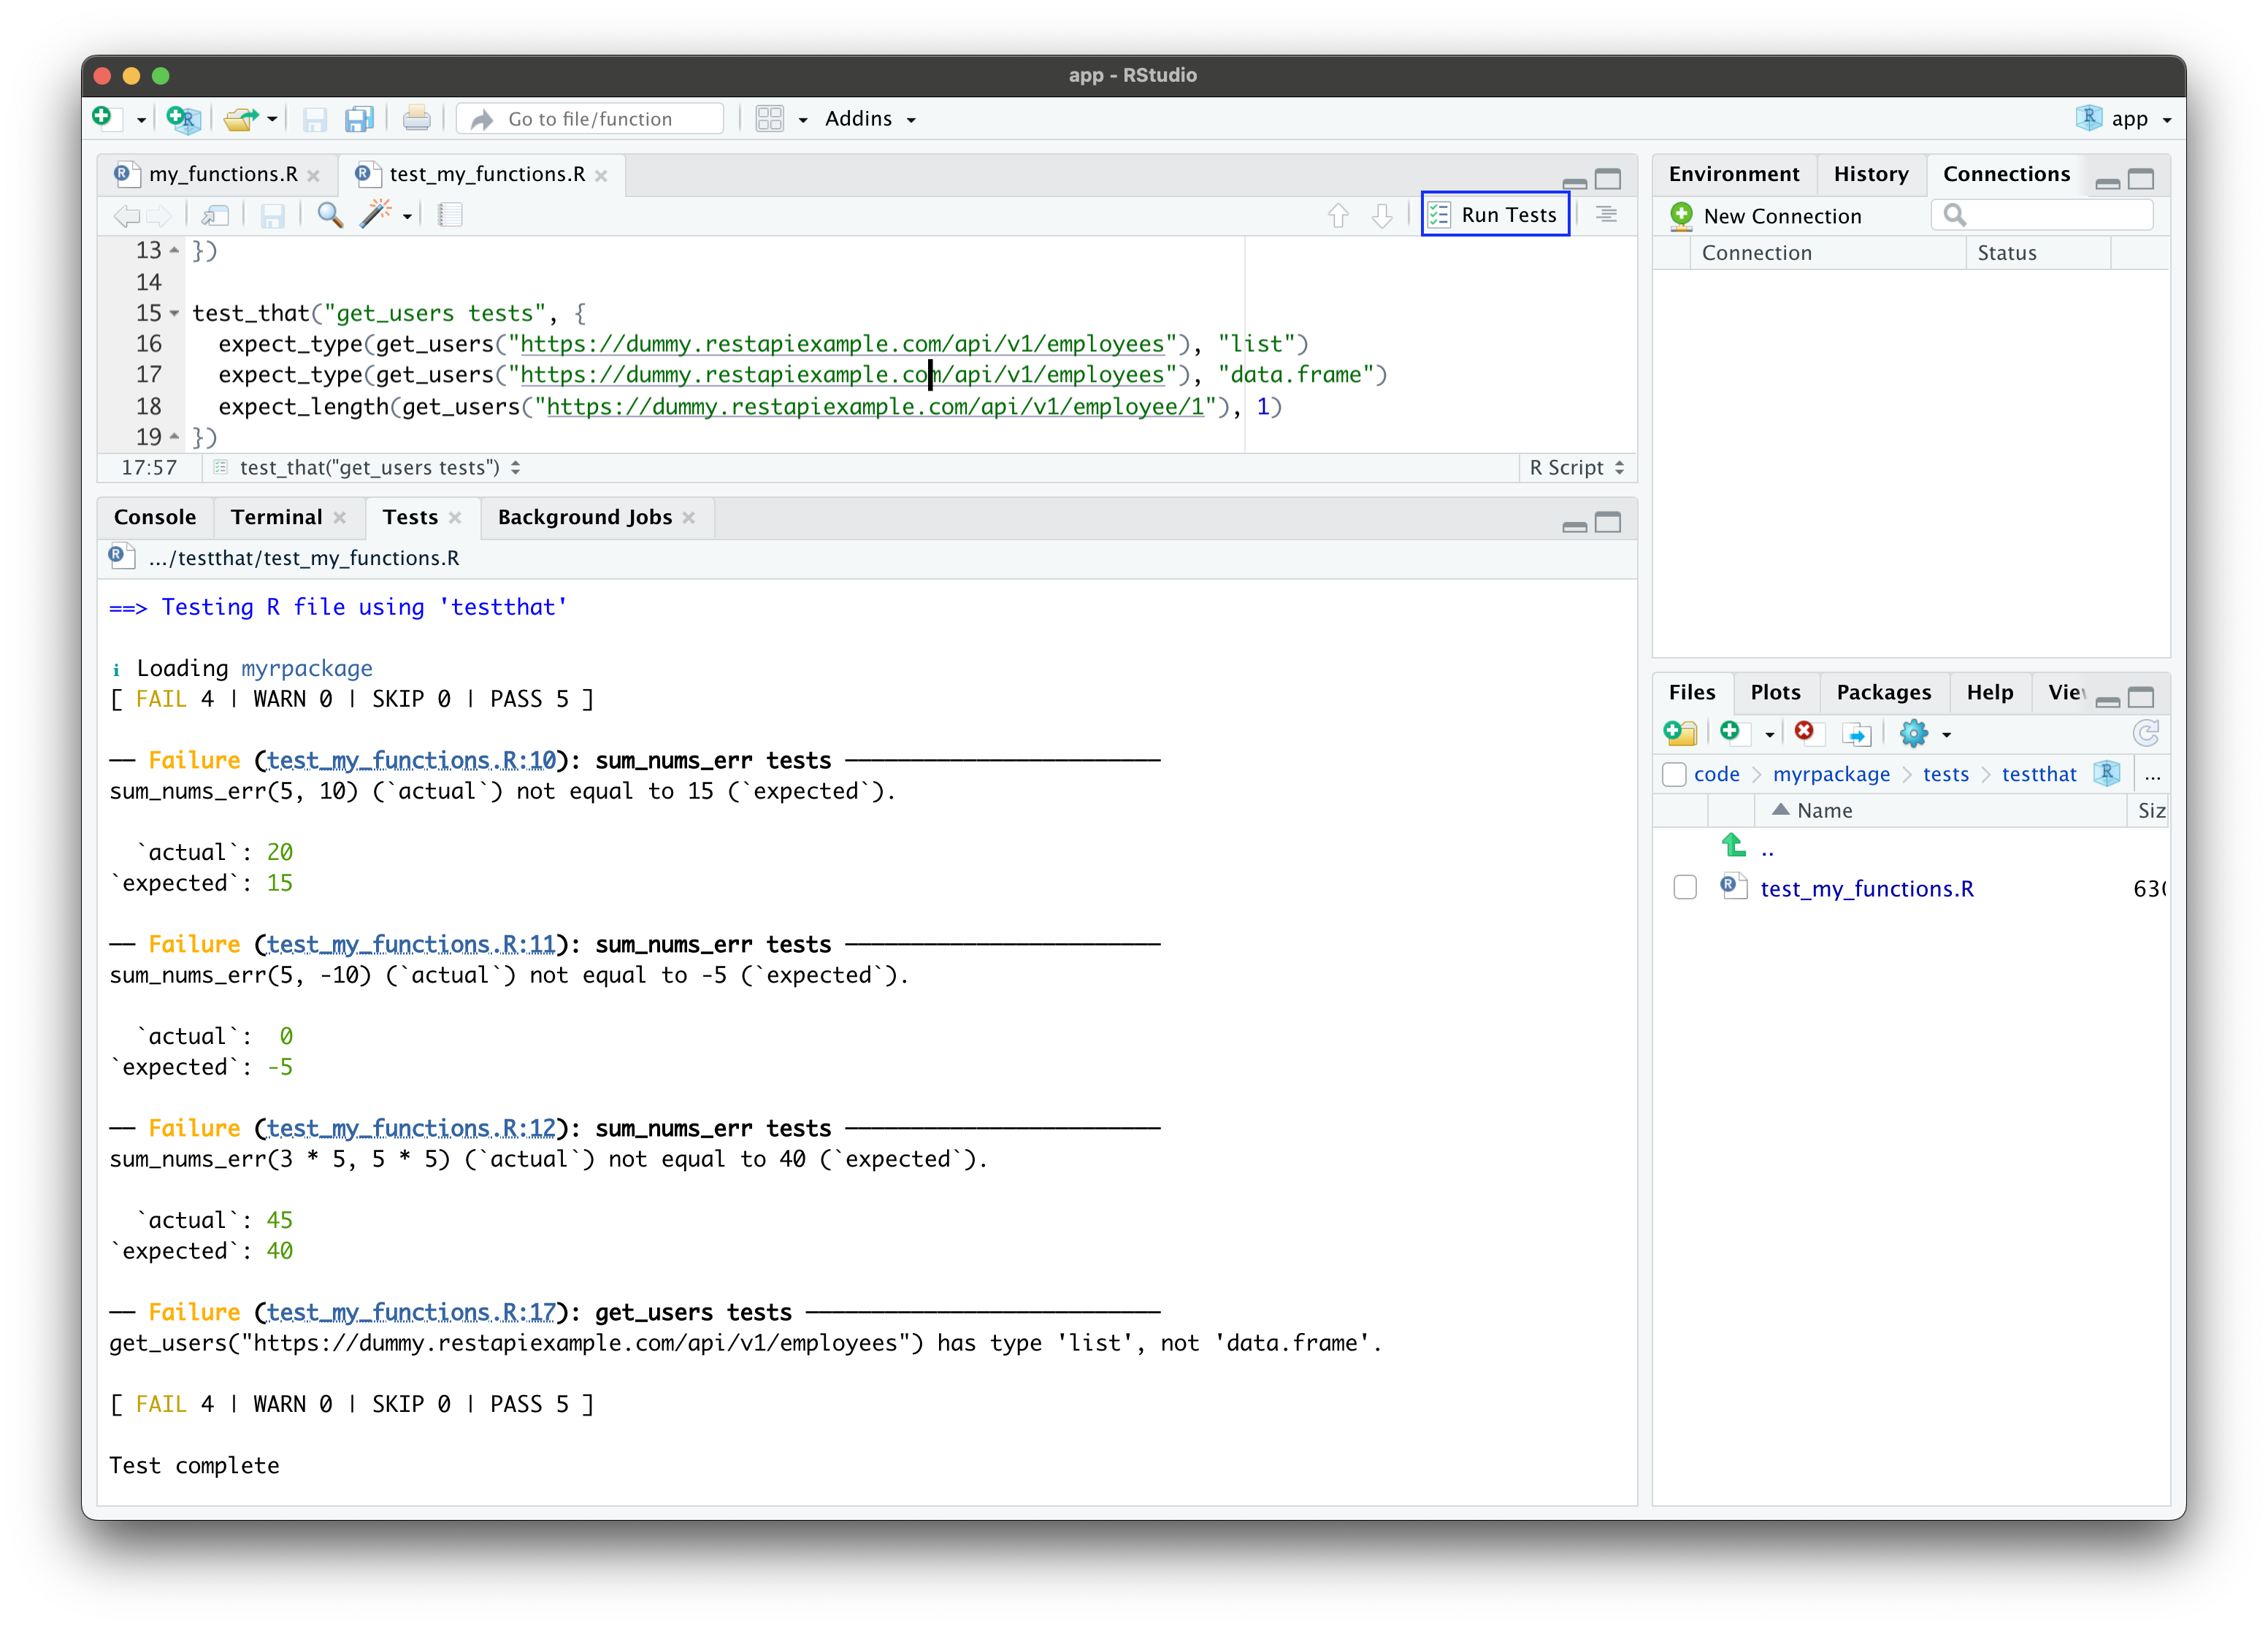
Image 6 – Running package tests in RStudio (your version of RStudio may differ, check for the ‘Build’ tab in the top right pane)
As you can see, we have four failed tests, all of which we knew that would occur.
That’s how easy it is to test R packages in RStudio. Before proceeding, I recommend you create your own unit tests. Preferably, create tests that you know will pass or fail in certain scenarios. You could write a test that you know will pass, and then alter the code so that the unit test will expose the change as a failed test.
We’ll now shift our focus to Python package tests.
Python Tests in RStudio with PyTest
There are numerous testing libraries when it comes to Python, but we’ll stick to pytest. It takes a single shell command to install it, but first, there’s a bit of setting up to do.
RStudio has taken its first steps into better Python integration. It might not be as strong as R integration, but it will progress over time. We’ll make sure to give you an update, so stay tuned to Appsilon Blog.
The first step we have to do, or at least it’s recommended to do is to set up a new Python virtual environment. This will keep all the dependencies separate from the global Python interpreter, so we can be sure there’s no dependency mismatch.
Navigate to a folder in which you want to save the Python library, and then run the following shell commands:
python3 -m venv .venv
source .venv/bin/activate

pip install wheel setuptools twine requests pandas pytest pytest-runner
You can also specify Python versions. This can be managed with pyenv and the pyenv-virtualenv plugin. This is generally good practice in Python when working with envs. If you choose to do this then run the following shell commands:
pyenv install 3.9.15
pyenv virtualenv 3.9.15 my-env-name
pyenv local my-env-name
The last will create a .python-version file. Later with the pyenv and file above, the environment will activate automatically (no longer requiring sourcing it with venv).
But we will proceed without pyenv.
Python Library Continued
These will create and activate a new virtual environment, but also install a couple of dependencies we’ll use throughout the section, such as requests for making HTTP requests, pytest for testing, and pandas for working with data.
The next step is to create a directory structure. You can do this from a code editor or from a Terminal. We’ll give you a couple of shell commands you can copy:
touch setup.py
touch README.md

mkdir mypylib
cd mypylib
touch __init__.py
touch my_functions.py
cd ..

mkdir tests
cd tests
touch __init__.py
touch test_my_functions.py
You shouldn’t see any output if following along, but the Terminal window should look similar to this:
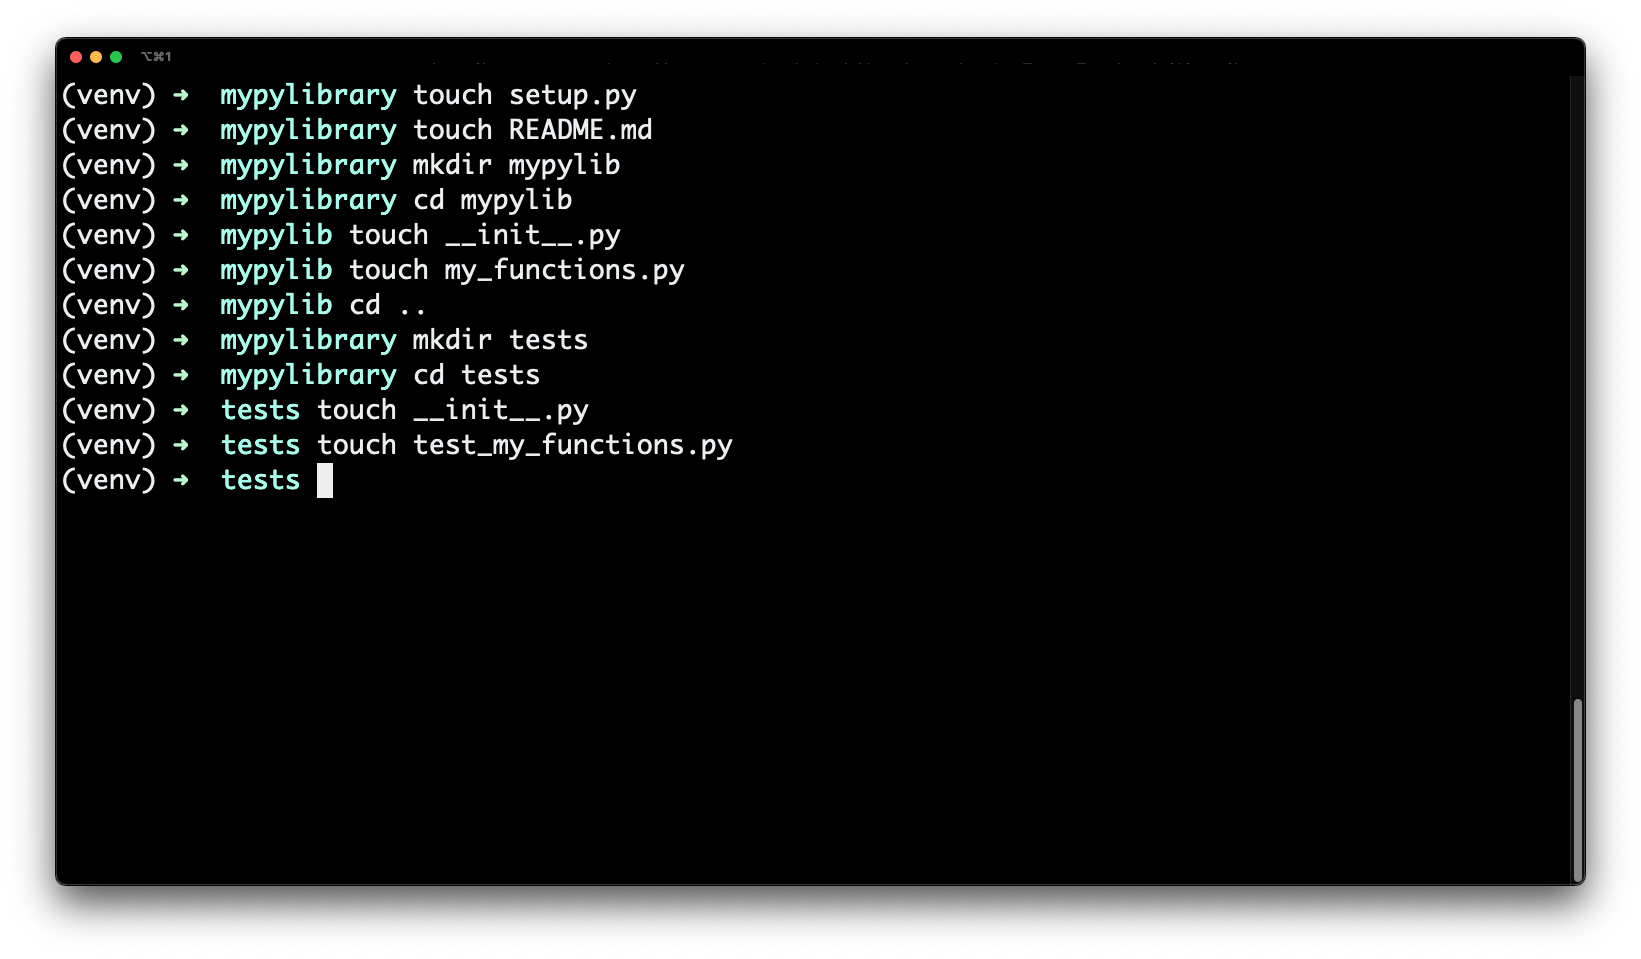
Image 7 – Creating a Python directory structure
For additional confirmation, the file and folder structure should look like this:
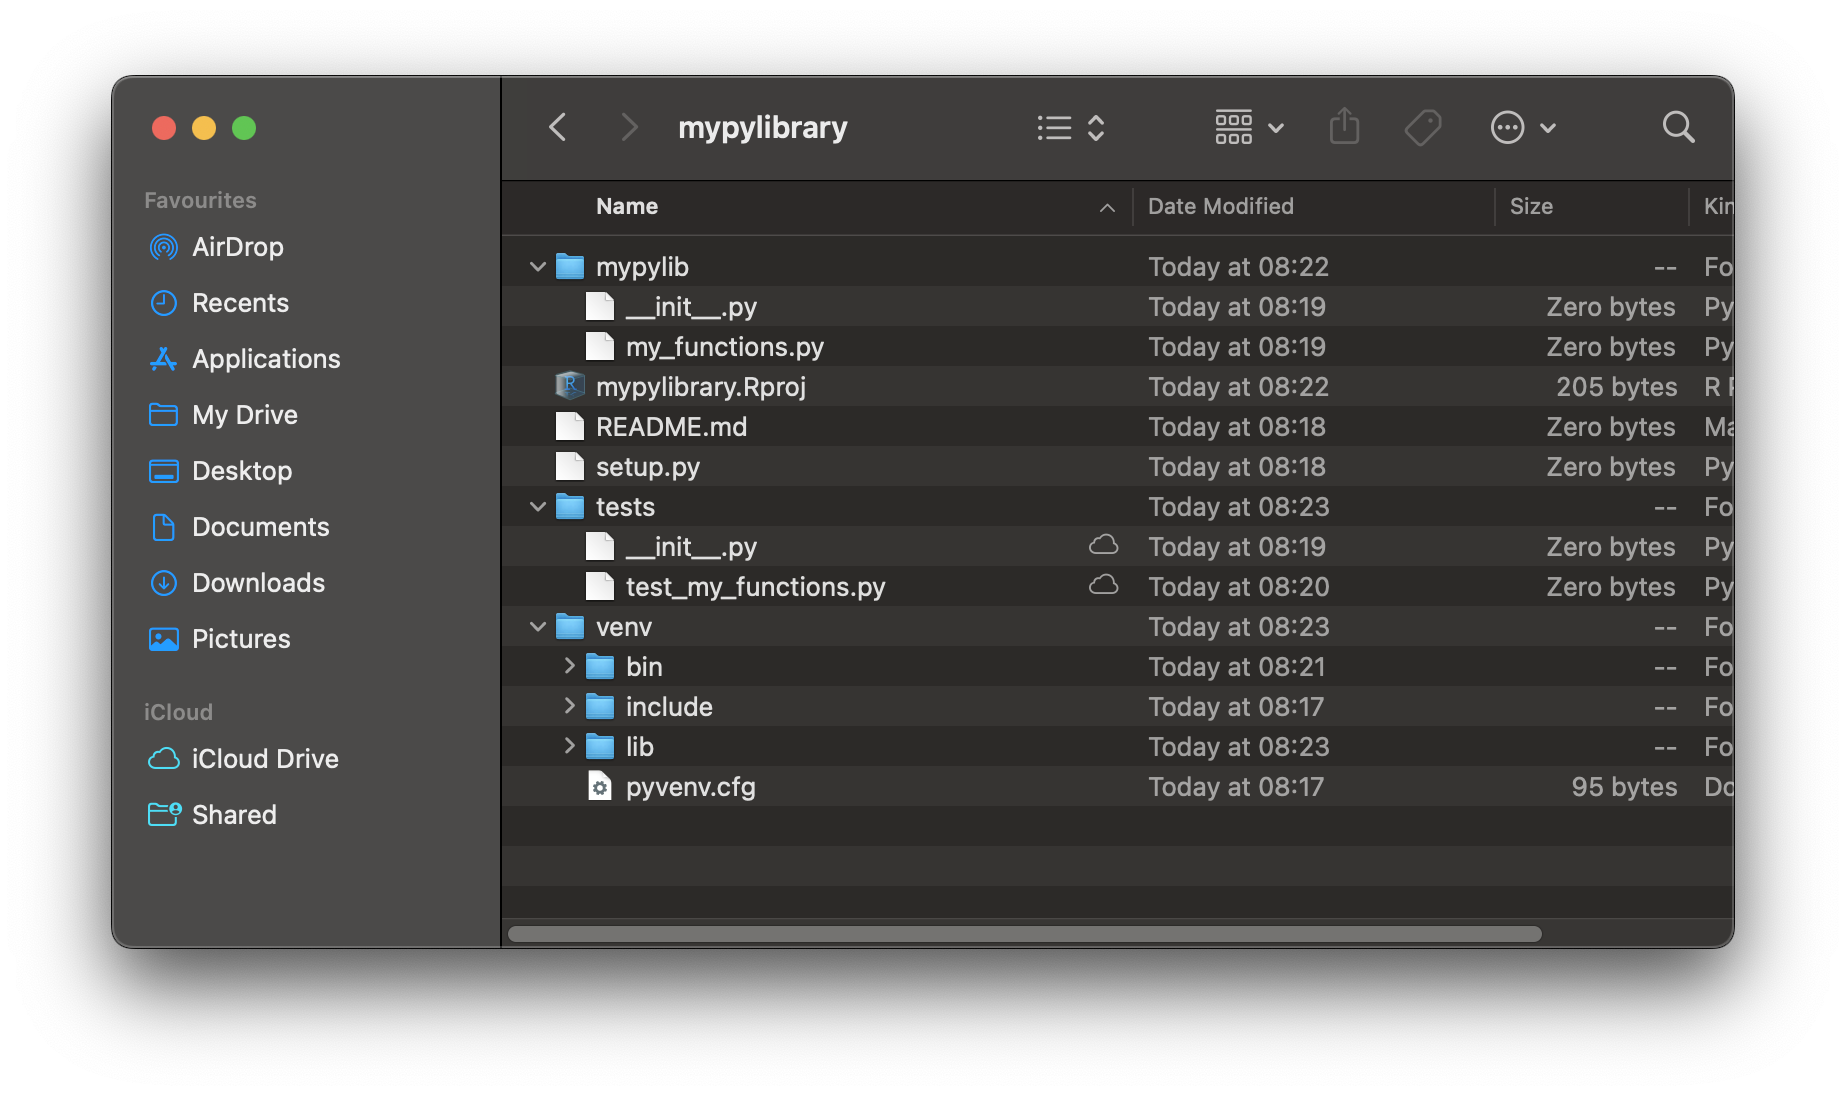
Image 8 – Python library file and folder structure
But what do these files stand for? Let’s go over them one by one:
mypylib/– A folder that contains the code for your custom Python library.mypylib/__init__.py– Marks a directory as a Python package directory.mypylib/my_functions.py– Our source logic, Python code accessible after installing the library.README.md– Text description of the library.setup.py– A file that indicates the package has been packaged with Distutils, and makes for easy installation withpip.tests/– A folder containing Python test files.tests/__init__.py– Marks a directory as a Python package directory.tests/test_my_functions.py– Python file containing the actual tests for themy_function.pyfile.venv/– Virtual environment files and folders.
As you can see, Python’s pytest follows the test_ naming convention, identically to R’s testthat, which is one less thing to remember!
With the basics out of the way, open up mypylib/my_functions.py file and paste the following code:
import requests
import pandas as pd


def sum_nums(a, b):
  return a + b


def sum_nums_err(a, b):
  return a + b + 5


def get_users(url):
  headers = {"User-Agent": "Mozilla/5.0 (Macintosh; Intel Mac OS X 10_15_7) AppleWebKit/605.1.15 (KHTML, like Gecko) Version/16.1 Safari/605.1.15"}
  req = requests.get(url, headers=headers)
  res = req.json()
  return pd.DataFrame(res["data"])
The get_users() function needs an extra headers information if you want to avoid the 406 status, but everything else is identical, with the obvious R to Python translation. We can import and use the libraries as we normally would in Python, there’s no need for “double colon” or any other special notation.
And finally, let’s take care of the test file. Open up tests/test_my_functions.py and paste in the following:
from mypylib import my_functions
import pandas as pd


def test_sum_nums():
  assert my_functions.sum_nums(5, 10) == 15
  assert my_functions.sum_nums(5, -10) == -5
  assert my_functions.sum_nums(3 * 5, 5 * 5) == 40


def test_sum_nums_err():
  assert my_functions.sum_nums_err(5, 10) == 15
  assert my_functions.sum_nums_err(5, -10) == -5
  assert my_functions.sum_nums_err(3 * 5, 5 * 5) == 40


def test_get_users():
  assert type(my_functions.get_users("https://dummy.restapiexample.com/api/v1/employees")) == list
  assert type(my_functions.get_users("https://dummy.restapiexample.com/api/v1/employees")) == pd.DataFrame
  assert len(my_functions.get_users("https://dummy.restapiexample.com/api/v1/employee/1")) == 1
As you can see, it’s almost identical to what we had previously in R, just translated into Python.
Run the tests now by running the following command from the Terminal:
pytest -vYou’ll immediately see the following output on the screen:
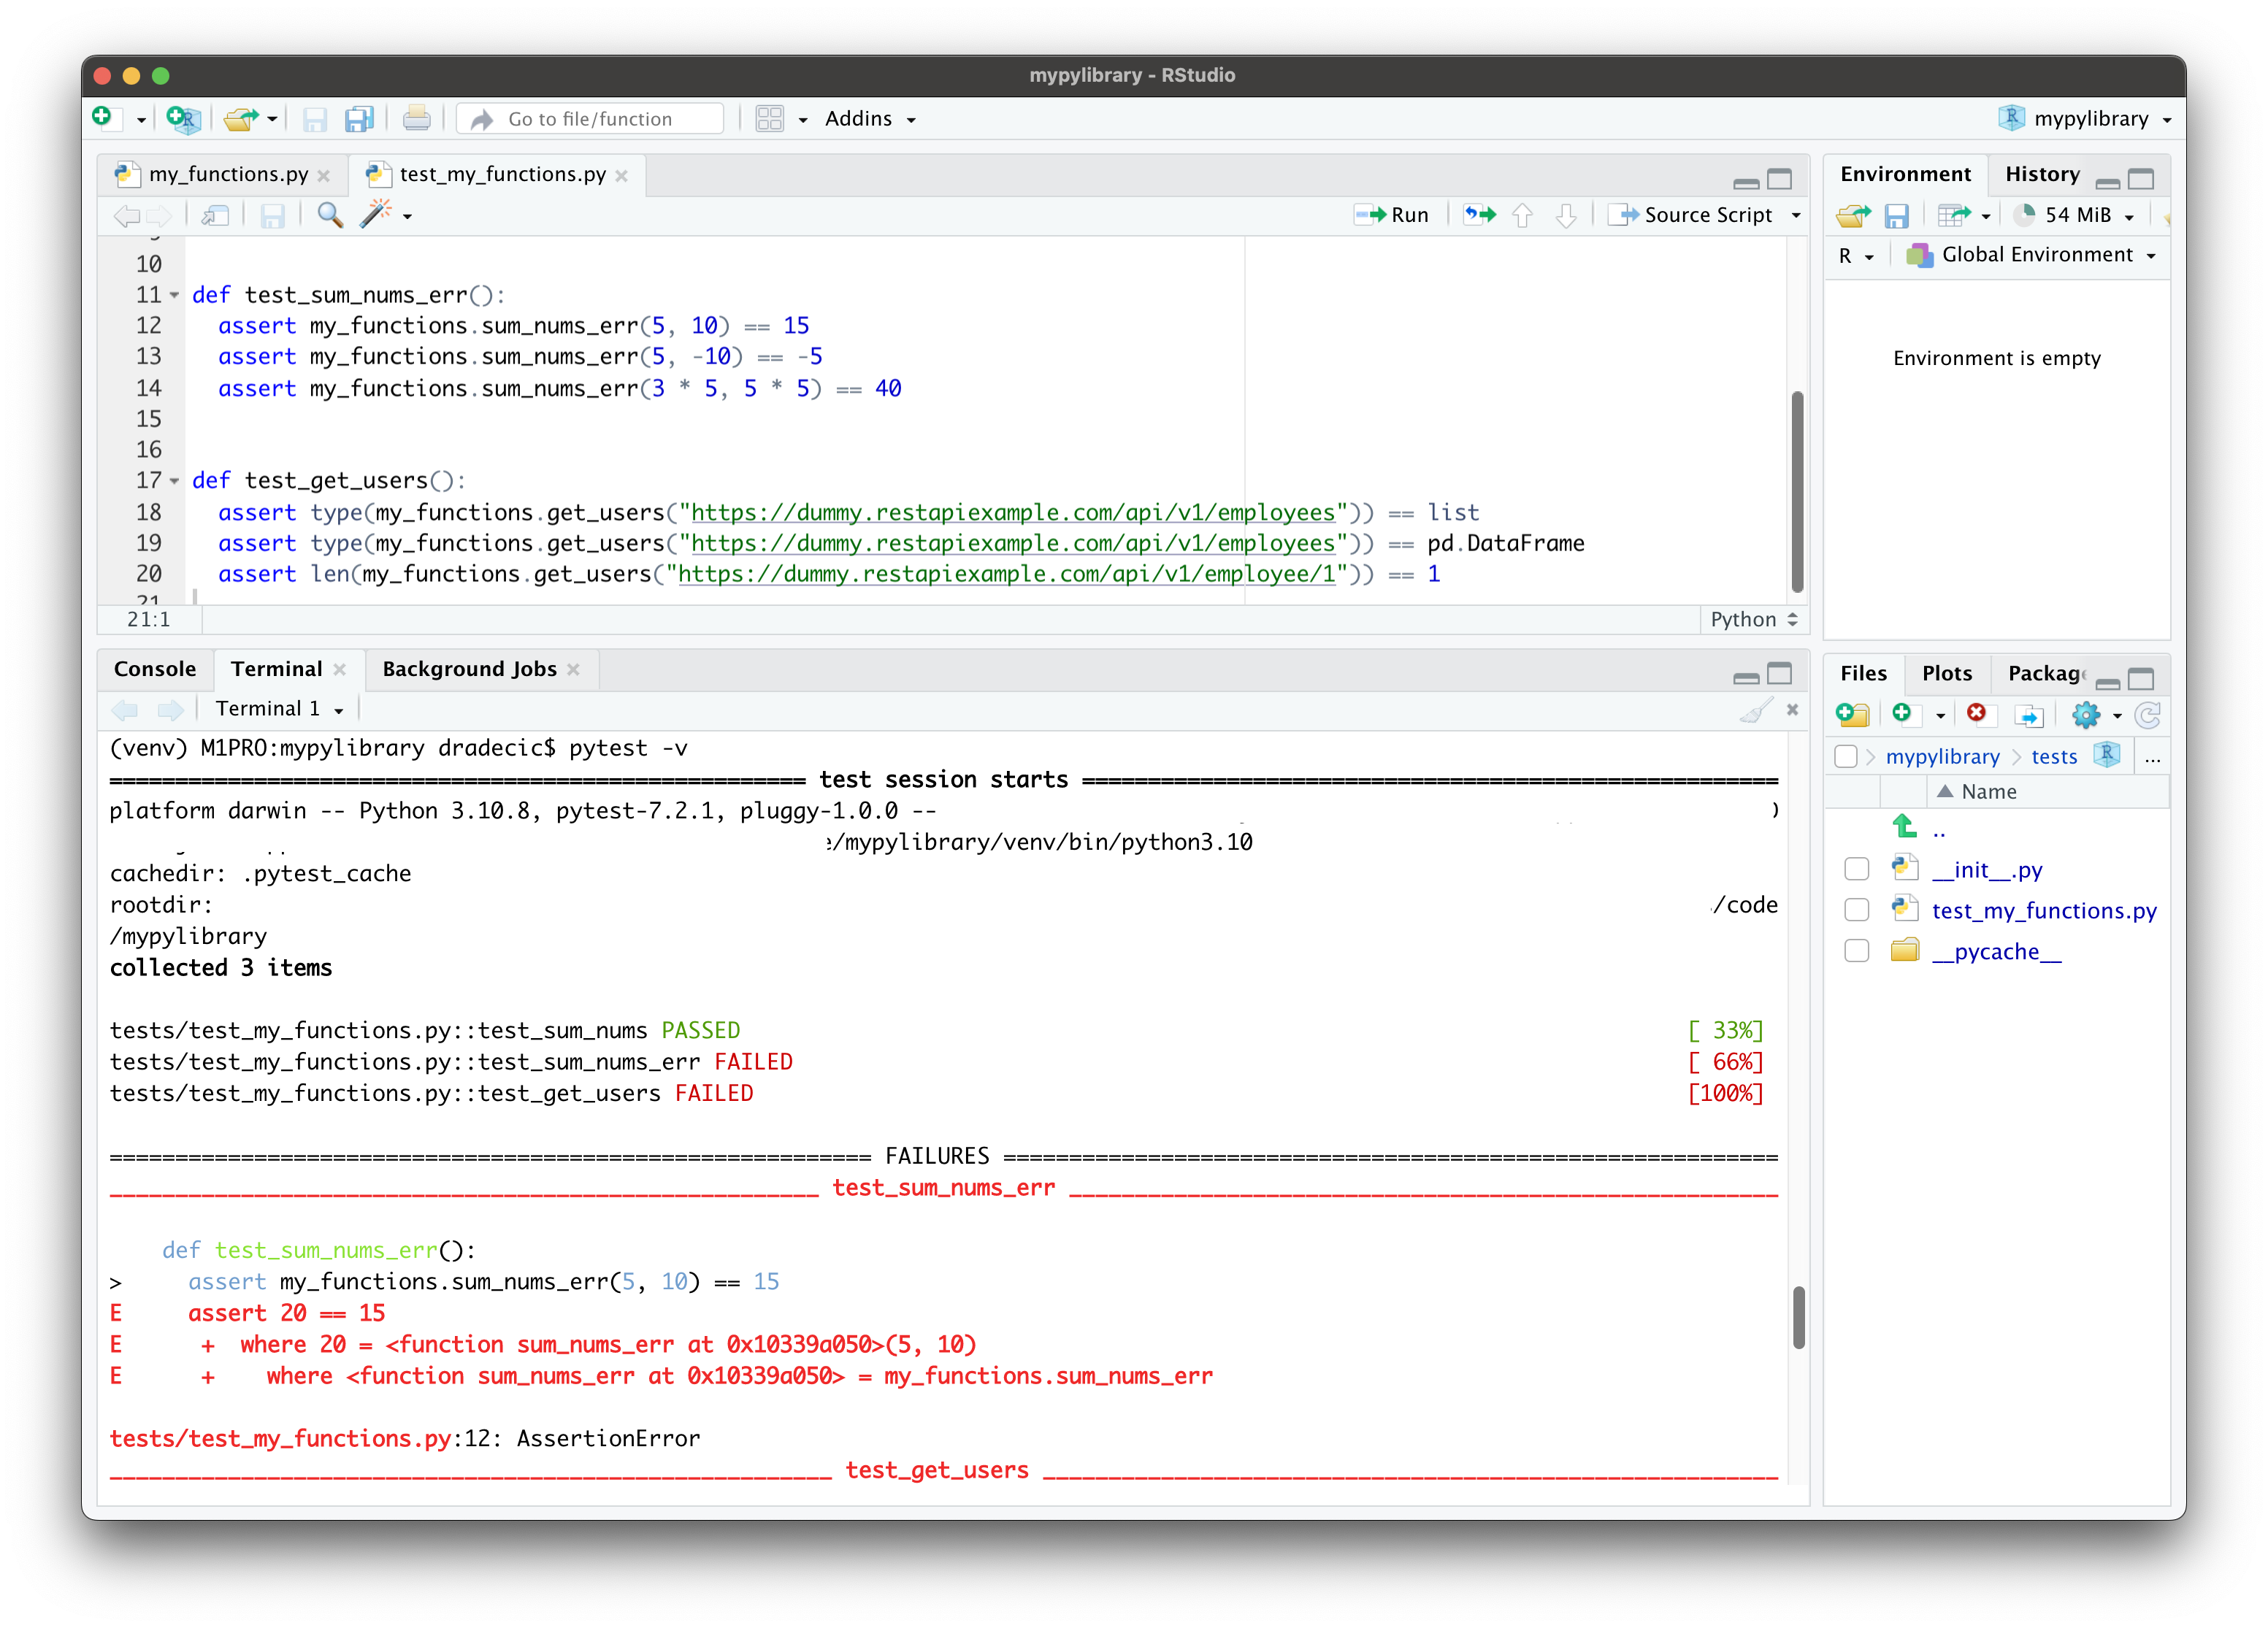
Image 9 – PyTest output (1)
Python provides you with a lot of details on what went wrong, too much to fit the screen. If you’d like to see less of it, simply run pytest or pytest tests without -v; additionally, you can explore how to run a single test file or single test from a certain file here.
Here’s the last portion of the output:
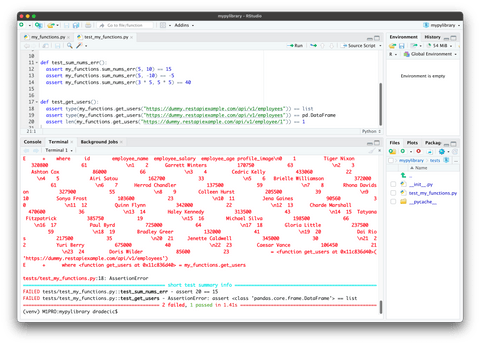
Image 10 – PyTest output (2)
We got the same passes and failures as in R with one exception – the get_users() function returns a pd.DataFrame instead of a list, so that’s the case that failed here. Otherwise, the output conveys the same information.
Up next, we’ll take a look at some common tips and tricks when working with package tests in RStudioo and tests in general.
Package Tests and RStudio IDE – Tips & Tricks
We’ll now go over a series of best practices when it comes to unit tests and package tests, written from years of experience in the field.
Keep Things Simple
As you increase the level of complexity in your tests, you’re likely to introduce errors to them. “Testing” tests is not a thing, so make sure to keep them simple, readable, and easy for developers to understand.
Have you heard of cyclomatic complexity? It’s a term that indicates the number of possible execution paths a given function can follow. Naturally, a function with a lower cyclomatic complexity is easier to follow, understand, and maintain, which means you’re less likely to introduce bugs when working on it.
You should always optimize for a low cyclomatic complexity (e.g., with a linter tool), especially when writing tests.
Keep Things Deterministic
A piece of code should always behave the same if no changes were made to it – that’s the basic definition of the word deterministic. In unit and package tests, this means a function should always pass or always fail the test, provided you don’t change the underlying logic behind it, irrelevant of how many times you run it.
Having nondeterministic tests – or tests that sometimes pass and sometimes fail without changes to the logic – means developers won’t trust them.
Make sure your tests don’t depend on other tests, file systems, network and API availability, and other environmental values. That’s the only way to ensure your tests are deterministic.
Always Address a Single Use Case
This one is simple to understand. Every test you write should be used to test a single use case, and a single use case only.
Writing tests this way will give you a better insight into the reasons why the test case failed, which means you’ll be faster in discovering code errors.
Want to make your R code more durable? Make sure to optimize on these 4 areas.
Make Sure the Tests are as Fast as Possible
If it takes ages to run your tests, most developers will skip them, or won’t run them as often as they should. Do everything you can to make the tests fast because extensive and repeated testing is the only way to have confidence in your code.
There isn’t a concrete definition of how fast is fast enough, so that’s something you’ll have to figure out on your own. Faster is always better.
Consider Test Automation
Automated tests represent the type of test done without much human intervention. Sure, people have to develop this framework when first starting out, but from that point, the execution is done automatically, usually as a part of the built process.
But why bother with automation? Testing small units is tedious, repetitive, and less reliable than conducting tests in an automated manner. A dedicated unit testing framework can help you with making testing more automated. Automated testing is also considered to be more efficient, cheaper, and time-saving.
The most common approach nowadays is by utilizing a CI/CD pipeline (Continuous Integration / Continuous Deployment), which is an important DevOps and Agile methodology practice.
Summing up Tests and RStudio IDE
It’s always a good idea to make your code testable; it’s the only way to ensure it will run smoothly as you continue to make changes to your project. Today you’ve learned how to approach package tests in R and Python, and specifically how to use RStudio for the job. It’s not perfect for Python yet, but we expect the level of support to skyrocket in the near future due. Be sure to check out the Posit::Conf 2023 to hear the latest and greatest from the RStudio creators.
We hope you liked our guide. Feel free to share thoughts and ideas in the comment section below, or reach out to us on Twitter – @appsilon. We’d love to hear your thoughts on package testing and unit testing in general.
What is User Testing? Read (and watch) our guide to effective user tests.
Contact Us
