

 Share
Share Tweet
Tweet Share
Share


Interactive Quarto Reports with Shiny using {shiny.i18n}

13 March 2023
Quarto is exciting! It is simple, seamless, and easy to use! Do you know what makes it even better? Interaction. Quarto integrates with R/Shiny instances and provides you with a way to make your documents interactive.
In our previous tutorial on shiny.i18n + Quarto, we cooked up a static document. In this example, we will do something different. We’ll try to make a Quarto instance that is powered by R/Shiny. Instead of using static translations, we will leverage a dropdown to select the languages instead.
TOC:
- The final product
- Making a Quarto document
- Adding some Markdown
- translation.json
- UI: The Selector
- Server: The Output
What are we making? (Quarto + Shiny interactive document) 👀
Note that this is a simple example. The possibilities are vast! So, let’s dive into making a document that looks like the one above.
Are you new to Quarto? Try our beginner’s R Quarto tutorial.
Let’s begin: Quarto document + Shiny🌱
To begin, let’s make a Quarto document. Posit has a wonderful page where you can learn how to get started. Once you have a .qmd file ready, edit the beginning to look like the following.
---
title: "Quarto (Interactive Example)"
author: "Appsilon"
format:
   html: default
server: shiny
---
Notice the server: shiny bit. This is crucial since it tells Quarto that this is an interactive document.
Please make sure you do have the Shiny installed. If not, use install.packages(“shiny”) to get it up and running. This tutorial assumes that quarto, Shiny, and shiny.i18n, along with all their imports such as rmarkdown, jsonlite et al. are all installed and loaded in the environment.
Adding some Markdown 📃
As you would in a standard .rmd or .qmd file, you can use the markdown syntax to create headings and hyperlinks.
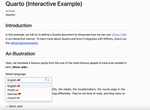
## Introduction

In this example, we will try to define a Quarto document to showcase how we can use `shiny.i18n` in an interactive manner. To learn more about Quarto and how it integrates with R/Shiny, check out the [official documentation](https://quarto.org/docs/interactive/shiny/).

## An Illustration

Here, we translate a famous quote from the one of the most famous people to have ever existed in tech, **Steve Jobs**...
This will set a basic structure with some text and two headings. Now we can move on to the more interesting stuff.
Are you more of a
ipynbfan? Try our tutorial on Quarto and Jupyter Notebooks.
Onto the tinkering with shiny.i18n🧰
So far, so good. We have most of our work ready. Now, we need to do the following:
- Build a translation.json file
- Build the UI
- Build the Server
So, let’s get going!
translation.json 🌐
If you’ve followed any of our previous tutorials, you know that the shiny.i18n package relies on a translations.json file, which is simply a mapping of all the strings in a key-value format where the key maps to several languages. For the file here, we only have one string, which is the quote.
{
  "languages": [
      "key",
      "en",
      "pl",
      "de",
      "fr"
    ],
  "translation": [
      {
        "key": "quote",
        "en": "Here's to the crazy ones. The misfits, the rebels, the troublemakers, the round pegs in the square holes, the ones who see things differently. They're not fond of rules, and they have no respect for the status quo.",
        "pl": "Oto dla szalonych. Odmieńcy, buntownicy, wichrzyciele, okrągłe kołki w kwadratowych dziurach, ci, którzy widzą rzeczy inaczej. Nie lubią zasad i nie mają szacunku dla status quo.",
        "de": "Auf die Verrückten. Die Außenseiter, die Rebellen, die Unruhestifter, die runden Stifte in den eckigen Löchern, die das anders sehen. Sie mögen keine Regeln und haben keinen Respekt vor dem Status quo.",
        "fr": "Voici pour les fous. Les inadaptés, les rebelles, les fauteurs de troubles, les chevilles rondes dans les trous carrés, ceux qui voient les choses différemment. Ils n'aiment pas les règles et n'ont aucun respect pour le statu quo."
      }
    ]
}
Please ensure that the file is in the same directory as the .qmd file to make things simpler. Once you have the above in the JSON file, we can begin adding the UI elements to the document.
UI: The Selector 👆
In the .qmd file, we will create an {r} code chunk using the following syntax.
```{r}
YOUR CODE HERE
```
Here, we use some functions from Shiny to build a simple UI.
```{r}
library(shiny)
selectInput(
  inputId = "language",
  label = "Select language: ",
  choices = list("English 🇬🇧" = "en",
                 "Polish 🇵🇱" = "pl",
                 "German 🇩🇪" = "de",
                 "French 🇫🇷" = "fr"),
  selected = "en",
  multiple = FALSE,
  selectize = TRUE
)

htmlOutput("quote")
HTML("<em>— Steve Jobs</em>")
br()
```
The above sets the UI part of the document. If you are familiar with R/Shiny apps, this is typically what would go in the ui.R in a simple app.
Server: The Output 💬
To tell Quarto which {r} chunk is the server, we use #| context: server in the code. For more information, the Quarto documentation discusses Execution Contexts. The rest is as you would build the code for the server in an R/Shiny app.
```{r}
#| context: server
library(shiny.i18n)

i18n <- Translator$new(translation_json_path = "translation.json")
output$quote <- renderText({ i18n$set_translation_language(input$language) paste0("<blockquote style='text-align: justify;'>", i18n$t("quote"), "</blockquote>")
})
```
In the chunk above, we first tell Quarto this is the server for this interactive document. Then, we load the {shiny.i18n} package and also load the translation file by building a Translator object. Then, we simply set the translation language using i18n$set_translation_language() and pass the input$language which contains the result from the dropdown selector.
Finally, we use i18n$t(“quote”) to fetch the string from the translations.json file, and that’s it!
In the end, your document should look like the following.
---
title: "Quarto (Interactive Example)"
author: "Appsilon"
format:
   html: default
server: shiny
---

## Introduction

In this example, we will try to define a Quarto document to showcase how we can use `shiny.i18n` in an interactive manner. To learn more about Quarto and how it integrates with R/Shiny, check out the [official documentation](https://quarto.org/docs/interactive/shiny/>).

## An Illustration

Here, we translate a famous quote from the one of the most famous people to have ever existed in tech, **Steve Jobs**...

```{r}

selectInput(
  inputId = "language",
  label = "Select language: ",
  choices = list("English 🇬🇧" = "en",
                 "Polish 🇵🇱" = "pl",
                 "German 🇩🇪" = "de",
                 "French 🇫🇷" = "fr"),
  selected = "en",
  multiple = FALSE,
  selectize = TRUE
)

htmlOutput("quote")
HTML("<em>— Steve Jobs</em>")
br()
```

```{r}
#| context: server
library(shiny.i18n)

i18n <- Translator$new(translation_json_path = "translation.json")
output$quote <- renderText({ i18n$set_translation_language(input$language) paste0("<blockquote style='text-align: justify;'>", i18n$t("quote"), "</blockquote>")
})
```
Let’s Knit it up!🧶
All you have to do now is Run the document and you should see the document in your browser. Are you on your phone? No worries, you can also explore the document on our shiny.i18n demo app.
In this tutorial, we’ve built a simple interactive Quarto document and used the {shiny.i18n} package to dynamically translate a string using a selectInput dropdown. And now, we leave it up to you to build your own interactive documents and translate them on the fly!
If you’re like us, you work with international teams across the globe. Use translation in your reporting to make things easier and faster for everyone to understand.
If you want to explore shiny.i18n or our other Shiny packages – head over to rhinoverse.dev to discover demos, documentation, tutorials, and more!
Contact Us
R/Shiny Developer

Get Updates
Subscribe to Shiny Weekly Newsletter
Join 4000+ Shiny enthusiasts to see the latest Shiny news from the R community.


