Share
Share Tweet
Tweet Share
Share


TL;DR
Describes the best practices for setting automated test architecture for Shiny apps. Automate and test early and often with unit tests, user interface tests, and performance tests.
Best Practices for Testing Your Shiny App
Even your best apps will break down at some point during development or during User Acceptance Tests. I can bet on this. It’s especially true when developing big, enterprize applications with the support of various team members and under a client’s deadlines pressure. It’s best to find those bugs on the early side. Automated testing can assure your product quality. Investing time and effort in automated tests brings a huge return. It may seem like a burden at the beginning, but imagine an alternative: fixing the same misbehavior of the app for the third time e.g. when a certain button is clicked. What is worse, bugs are sometimes spotted after changes are merged to the master branch. And you have no idea which code change let the door open for the bugs, as no one checked particular functionality for a month or so. Manual testing is a solution to some extent, but I can confidently assume that you would rather spend testing time on improving user experience rather than looking for a missing comma in the code.
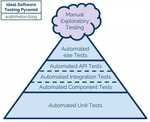
How do we approach testing in Appsilon? We aim to organize our test structure according to the “pyramid” best practice:
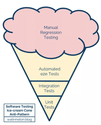
FYI there is also an anti-pattern called the “test-cone”. Even such tests architecture in the app I would consider a good sign, after all the app is (automatically) tested – which is unfortunately often not even the case. Nevertheless switching to the “pyramid” makes your tests more reliable and effective plus less time-consuming.
No matter how extensively you are testing or planning to test your app, take this piece of advice: start your working environment with automated tests triggered before merging any pull request (check tools like CircleCI for this). Otherwise, you would soon hate finding bugs caused by developers: “Aaaa, yeah, it’s on me, haven’t run the tests, but I thought that the change is so small and not related to anything crucial!” (I assume it goes without saying that no changes go into ‘master’ or ‘development’ branches without proper Pull Request procedure and review).Let’s now describe in detail different types of tests:
Unit Tests
… are the simplest to implement and most low-level kinds of tests. The term refers to testing the behavior of functions based on the expected output comparison. It’s a case-by-case approach – hence the name. Implementing them will allow you to recognize all edge cases and understand the logic of your function better. Believe me – you will be surprised what your function can return when starting with unexpected input. This idea is pushed to the boundaries with the so-called Test-Driven Development (TDD) approach. No matter if you’re a fan or rather skeptical at the end of the day you should have implemented good unit tests for your functions.
How to achieve it in practice? The popular and well-known package testthat should be your weapon of choice. Add the tests folder in your source code. Inside it, add another folder testthat and a script testthat.R. The script’s only job will be to trigger all of your tests stored in testthat folder, in which you should define scripts for your tests (one script per functionality or single function – names should start with “test_” + some name that reflects the functionality or even just the name of the function). Start such a test script with context() – write inside some text that will help you understand what the test included is about. Now you can start writing down your tests, one by one. Every test is wrapped with test_that() function, with the text info what is exactly tested followed by the test itself – commonly just calling the function with a set of parameters and comparing the result with the expected output, e.g.
 result <- sum(2, 2)

 expect_equal(result, 4)
Continue adding tests for single function and scripts for all functions. Once it is ready, we can set the main testthat.R script. You can use there code: test_check(“yourPackageName”) for apps as packages or general test_results <- test_dir(“tests/testthat”, reporter = “summary”, stop_on_failure = TRUE).
User Interface (UI) Tests
The core of those tests is to compare the actual app behavior with what is expected to be displayed after various user actions. Usually, it is done by comparing screen snapshots with the reference images. The crucial part though is to set up the architecture to automatically perform human-user-like actions and take snapshots.
Why are User Interface (UI) tests needed? It is common that in an app development project, all of the functions are work fine, yet the app still crashes. It might be for example due to the JS code that used to do the job but suddenly stopped working as the object that it is looking for appears with a slight delay on the screen in comparison to what was there before. Or the modal ID has been changed and clicking the button does not trigger anything now. The point is this: Shiny apps are much more than R code with all of the JS, CSS, browser dependencies, and at the end of the day what is truly important is whether the users get the expected, bug-free experience.
The great folks from RStudio figured out a way to aid developers in taking snapshots. Check this article to get more information on the shinytest package. It basically allows you to record the actions in the app and select when the snapshots should be created to be checked during tests. What is important shinytest saves the snapshots as the json files describe the content. It fixes the usual problem with comparing images of recognizing small differences in colors or fonts on various browsers as an error. The image is also generated to make it easy for the human eye to check if everything is OK.
There is also an RSelenium package worth mentioning. It connects R with Selenium Webdriver API for automated web browsers. It is harder to configure than shinytest, but it does the job.
As shinytest is quite a new solution, in Appsilon we had already developed our internal architecture for tests. The solution is based on puppeteer and BackstopJS. The test scenarios are written in javascript, so it is quite easy to produce them. Plus BackstopJS has very nice-looking reports.
I guess the best strategy would be to start with shinytest and if there are some problems with using it, switch to some other more general solution for web applications.
Performance Tests
Yes, Shiny applications can scale. They just need the appropriate architecture. Check our case study and architecture description blog posts to learn how we are building large-scale apps. As a general rule, you should always check how your app is performing in extreme usage conditions. The source code should be profiled and optimized. The application’s heavy usage can be tested with RStudio’s recent package shinyloadtest. It will help you estimate how many users your application can support and where the bottlenecks are located. It is achieved by recording the “typical” user session and then replaying it in parallel on a huge scale.
So, please test. Test automatically, early, and often.
Smash down all the bugs before they become big, strong, and dangerous insects!
Follow Appsilon Data Science on Social Media
Follow @Appsilon on Twitter!
Follow us on LinkedIn!
Don’t forget to sign up for our newsletter.
And try out our R Shiny open source packages!
Contact Us
Project Manager

Get Updates
Subscribe to Shiny Weekly Newsletter
Join 4000+ Shiny enthusiasts to see the latest Shiny news from the R community.