


 Share
Share Tweet
Tweet Share
Share


How to Make Your Shiny App Beautiful

01 February 2024
Join the Shiny Community every month at Shiny Gatherings
Updated: September 27, 2022.
SASS is CSS for programmers. It gives you the building blocks that you’re used to, such as variables, conditions, and loops. And it helps you organize. The bigger the project, the bigger the advantages offered by SASS. It’s a way of managing CSS styles even if you’re not very good at it.
Prefer video over text? We have the same topic covered on our YouTube channel:
Table of contents:
So what about SASS vs. CSS? First of all, what is SASS? SASS (Syntactically Awesome Style Sheets) is a pre-processor of CSS; SASS code always compiles into CSS. In other words, SASS is a way of writing CSS without writing CSS. It gives you a subset of functions, variables, and other structures, that when compiled becomes normal CSS. The difference is that SASS provides other tools that make more sense for a developer.
The differences between the two are in the table below.
Image 1 – SASS and CSS comparison
SASS is object-oriented, so you don’t have simple statements as I showed you in this previous post. You have actual objects that work in the SASS environment, such as conditions, variables, and loops. It works more as a language, and not as a syntax. SASS allows nesting, which means that you can define elements inside of other elements.
If you know a bit of CSS, this means that whenever you define an element inside of another element, you are saying that the full rule needs to be the element inside of other elements. So instead of creating multiple rules, you can just create one. Because it’s object-oriented, it allows you to define sets of properties outside of the actual statements, and reuse them multiple times.
We’ll now go over three major advantages of using SASS over plain CSS. These are in no particular order, but worth learning in your web developer career.
SASS has 3 big advantages. The first advantage is the Mixin. It’s basically a statement that doesn’t really exist in your code but can be used as an object with multiple attributes.
Take, for example, displaying an HTML element as a Flex element. In this case, we have a typical CSS statement. We have a row class that is being given some CSS properties.
.row {
    display: -webkit-flex;
    display: flex;
}
We can extract these properties into the Mixin. And you do this by adding the Mixin keyword from SASS. You name it something and you add whatever rules you want inside.
Creating a Mixin:
@mixin flex {
    // write the css here
    display: -webkit-flex;
    display: flex;
}
And then when you are creating your SASS code, instead of setting every attribute by hand, you simply include the Mixin into the statement. If you want to use it 10 times, you just include it 10 times instead of defining it 10 times!
Using a Mixin:
.row {
    @include flex;
}
.column {
    @include flex;
}The second big advantage of SASS is functions –SASS actually allows you to define a function and it works in a way that you probably find familiar: name of the function, parameters, body of the function, and return statement.
So you can define a function by using the @function. You give it a name. You give it some parameters. And you give it a return statement.
For example, here is a function that defines the width of an element:
@function column-width($col, $total:8) {
    @return percentage($col/$total);
}

.col-3 {
    width: column-width(3);
}
Generated CSS:
.col-3 {
    width: 37.5%;
}
SASS allows you to use a variety of functions that are pre-built, such as percentage, sum, and average. There’s actually a big list. In the above case, we are creating a function that takes two parameters: a ‘col’ and an optional ‘total’ (if not specified, the default value is set to 8). And it returns the number divided by the total formatted as a percentage. It lets you create a width that works a bit like the Bootstrap columns. You have a total of how many columns in the project, and then you say “from this specific class I want it to occupy X amount of the screen.”
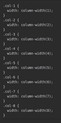
The third thing that SASS does really well is that it lets you make LOOPS. You can make loops and conditions. Loops are an easy way to create large amounts of CSS without having to repeat yourself. If, for example, we use the same function from before,
we can put that inside of a loop…
@for $i from 1 through $total {
    .col-#{$i} { width: column-width($i) };
}
…and create one class for each of those possible widths that we talked about previously.
Image 2 – Loops example
R Studio released this really cool library called sass:
@install.packages("sass")
sass lets you do all of this coding that I discussed before without having to use an external tool for it. So the main way you can use it is that the library exposes a function called “sass.” And this function takes either a string or a file and returns compiled CSS for whatever you fed it.
library(sass)
sass("
    $weight: 500;
    h1 { font-weight: $weight; }
    h2 { font-weight: $weight * 0.8; }
")
So that means you can define it directly in the code, wherever you want. You can have variables that are set in the application, and then the styling is defined whenever you run the application. If you have, for example, a variable that defines the background color of the application, you can then generate the actual styling rules just for that.
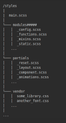
The most typical way, and the way I think you should use it, is by actually giving it a sass (.scss) file. A sass file can have a lot of different things.
Below you can see an example of a file structure you can have in a project. This is the one I usually like to use. It basically consists of the main file and then all of the other files that have small parts of the code and are usually divided according to some logic.
// Modules and Variables.
@import "modules/config";
@import "modules/mixins";
@import "modules/functions";
@import "modules/static";
// Partials.
@import "partials/_reset";
@import "partials/_layout";
@import "partials/_component";
@import "partials/_animations";
// Third-party.
@import "vendor/some_library";
@import "vendor/another_font";
One important thing — the order matters. If you want to have a file with all of your variables defined in the beginning, it should be the first file that you pass. And then you can use all of those variables in the rest of the files. Here is an example:
// Color pallete
$primary-red: rgb(217, 30, 73);
$primary-dark-red: rgb(166, 43, 78);
$primary-gray: rgb(147, 149, 151);
$primary-light-gray: rgb(167, 169, 172);
// Fonts
$main-font: 'Noto Sans', sans-serif;
// Sizes (in px).
$top-navigation-height: 0;
$bottom-navigation-height: 65;Long story short, learning SASS is a good idea if you’re a web developer. In 2022, some would argue it’s a requirement to get an entry-level job, and we agree. SASS is much more powerful than plain CSS, so it’s a reasonable job requirement.
Thanks for reading! We hope you give SASS a try. You can find the post author (Pedro Coutinho Silva) on Twitter – @sparktuga.
Resources:


